
初步认识 docker
为什么要学习 docker
有同学说他开发工作中有两大神器,一个是 vim 编辑器,另一个就是 Docker。
什么是 docker
Docker 是一个开源的应用容器引擎。
容器的发展之路
业务是基于应用运转,而应用通常运行在服务器中,以前每个服务器只能运行单一应用(见 Tip),若业务部门需要增加一个新应用,则需要IT部门去采购一台新的服务器,而由于不知道新增应用所需的服务器性能需要怎样,这时只能凭经验去购买。倘若服务器性能不足,可能会让交易失败而导致公司收益下降,所以通常会采购更好的服务器。这种做法,导致大部分服务器的使用率都处在较低的水平,对公司的资源是一种极大的浪费。
Tip:单一应用有两种含义:
- 单一应用可能指同一中应用程序只能在一台服务器上安装一个。比如 apache(默认80端口或443端口)、dns等,如果再安装一个 apache 可能就不行,有人说我换一个端口,那假如这个应用是单例的呢?就是只能有一个!
- 单一应用还可能指在一台服务器中只能按照一个操作系统。比如一台服务器只能安装一个操作系统,即已安装 win10,就不能再安装 xp
为了解决上面问题,VMware 公司给我们带来了 虚拟机(VM),于是我们就有了一种可以将多个应用同时运行在一个服务器中的技术。每当业务部门需要新增应用时,IT 部门无需去采购新的服务器,而会尝试在现有空闲服务器上部署新应用。从而为公司节省大量资金。
但是,虚拟机也也有缺陷,而像谷歌这样大规模 web 服务器玩家一直采用容器技术解决虚拟机模型的缺点。
容器模型和虚拟机模型相似,主要区别:容器运行不会独占操作系统。
- 运行在相同宿主机上的容器共享一个操作系统,这样就能节省大量系统资源,例如 cpu,内存。
- vm 独占操作系统,每个 os 都会占用额外的 cpu、内存,而这些资源本可以运行更多的应用。
- 某些情况下,os 需要许可证才能运行,os 也可能需要打补丁,由于容器不独占 os,所以较 vm 能节省维护和资金成本。
Tip:附上虚拟机和容器的图片 —— 取自 关于 Windows 容器


此外,虚拟机启动慢,并且在不同的虚拟机管理器(hypervisor)或者云平台之间迁移比想象中要困难得多。而容器启动更快,也更容器迁移。
Tip:现代容器技术起源于 linux,得益于许多人得持续努力和贡献。当今容器生态环境很大程度上受益于基金会,而基金会是由许多独立开发者以及公司组织共同创建和维护的。
docker 使容器变得简单
虽然容器技术很好,但对于大部分人(或组织)来说,容器技术的复杂性阻止了其实际应用,直到 docker 的出现,容器才被大众所接收。
docker 技术使 linux 容器技术得到了广泛应用,换个角度,是 docker 公司使容器变得简单。
docker 公司
docker 公司对外宣称:我们简化了开发人员(即正在做改变世界的 apps)的生活。
起先是一家名为 dotCloud 的平台即服务(PaaS)的提供商。底层技术, dotCloud 平台利用 Linux 容器技术,为了方便创建和管理容器, dotCloud 开发了一套内部工具,之后被命名为 Docker。
2013年, dotCloud 的 paas 业务不景气,于是他们聘请了一个新的 ceo,将公司改名为 Docker,同时放弃旧业务,开始一个新的征程:将 Docker 和容器技术推向全世界。
安装 Docker Desktop
点击 docker 官网的入门,映入眼帘的是:我们为您提供完整的容器解决方案——无论您是谁,以及您在容器化之旅的哪个阶段。
页面有两个东西:Desker Desktop(容器化应用程序的最快方式)和 Docker Hub。
- Docker Desktop,数百万正在构建容器化应用程序的开发人员的首选。
- Docker Hub,基于云的应用程序注册和开发团队协作服务。
Tip:Docker Hub类似 npm,npm 中可以搜索包,docker hub 可以搜索镜像。
作为开发人员,笔者选择下载 Desker Desktop 的 windows 版本。
Tip:笔者是 Windows 10 家庭中文版;Docker Desktop 4.5.1。
点击安装(一路 next 即可),然后启动,无需登录。进入如下界面:
打开 powsershell,查看 docker 版本信息:
exercise> docker version
Client:
 Cloud integration: v1.0.22
 Version:           20.10.12
 API version:       1.41
 Go version:        go1.16.12
 Git commit:        e91ed57
 Built:             Mon Dec 13 11:44:07 2021
 OS/Arch:           windows/amd64
 Context:           default
 Experimental:      true

Server: Docker Desktop 4.5.1 (74721)
 Engine:
  Version:          20.10.12
  API version:      1.41 (minimum version 1.12)
  Go version:       go1.16.12
  Git commit:       459d0df
  Built:            Mon Dec 13 11:43:56 2021
  OS/Arch:          linux/amd64
  // Experimental 为 false,表明当前运行的 docker 版本是非实验版本
  Experimental:     false
 containerd:
  Version:          1.4.12
  GitCommit:        7b11cfaabd73bb80907dd23182b9347b4245eb5d
 runc:
  Version:          1.0.2
  GitCommit:        v1.0.2-0-g52b36a2
 docker-init:
  Version:          0.19.0
  GitCommit:        de40ad0
Tip:docker version 命令(或其他命令)的详细请看 这里
镜像和容器
可以将 docker 镜像理解成一个包含 os 文件系统和应用的对象。
与虚拟机模板类似,虚拟机模板本质上是处于关机状态的虚拟机。在 Docker 世界中,镜像就等于未运行的容器。
亦或把镜像当作类(Class)
通过 docker image 可以查看镜像相关命令:
exercise> docker image

Usage:  docker image COMMAND

Manage images

Commands:
  build       Build an image from a Dockerfile
  history     Show the history of an image
  import      Import the contents from a tarball to create a filesystem image
  inspect     Display detailed information on one or more images
  load        Load an image from a tar archive or STDIN
  ls          List images
  prune       Remove unused images
  pull        Pull an image or a repository from a registry
  push        Push an image or a repository to a registry
  rm          Remove one or more images
  save        Save one or more images to a tar archive (streamed to STDOUT by default)
  tag         Create a tag TARGET_IMAGE that refers to SOURCE_IMAGE

Run 'docker image COMMAND --help' for more information on a command.
例如 docker image ls 能查看镜像列表:
aaron> docker image ls
REPOSITORY    TAG       IMAGE ID       CREATED        SIZE
目前没有镜像。
我们可以通过 docker pull 来下载镜像。例如 hello-world(Official Image 官方镜像)
exercise> docker pull hello-world
Using default tag: latest
latest: Pulling from library/hello-world
2db29710123e: Pull complete
Digest: sha256:97a379f4f88575512824f3b352bc03cd75e239179eea0fecc38e597b2209f49a
Status: Downloaded newer image for hello-world:latest
docker.io/library/hello-world:latest
再次查看镜像列表:
exercise> docker image ls
REPOSITORY    TAG       IMAGE ID       CREATED        SIZE
hello-world   latest    feb5d9fea6a5   4 months ago   13.3kB
接着我们可以通过 docker run 来运行镜像:
exercise> docker run hello-world

Hello from Docker!
This message shows that your installation appears to be working correctly.

To generate this message, Docker took the following steps:
 1. The Docker client contacted the Docker daemon.
 2. The Docker daemon pulled the "hello-world" image from the Docker Hub.
    (amd64)
 3. The Docker daemon created a new container from that image which runs the
    executable that produces the output you are currently reading.
 4. The Docker daemon streamed that output to the Docker client, which sent it
    to your terminal.

To try something more ambitious, you can run an Ubuntu container with:
 $ docker run -it ubuntu bash

Share images, automate workflows, and more with a free Docker ID:
 https://hub.docker.com/

For more examples and ideas, visit:
 https://docs.docker.com/get-started/
通过 docker ps 查看容器列表:
exercise> docker ps
CONTAINER ID   IMAGE     COMMAND   CREATED   STATUS    PORTS     NAMES
没有发现容器。添加 -a 参数显示所有容器(默认只显示运行中的容器):
exercise> docker ps -a
CONTAINER ID   IMAGE         COMMAND    CREATED         STATUS                     PORTS     NAMES
615e96c3e70e   hello-world   "/hello"   4 seconds ago   Exited (0) 3 seconds ago             interesting_goodall
从中发现有一个容器,状态时已退出(Exited)。
getting-started 镜像
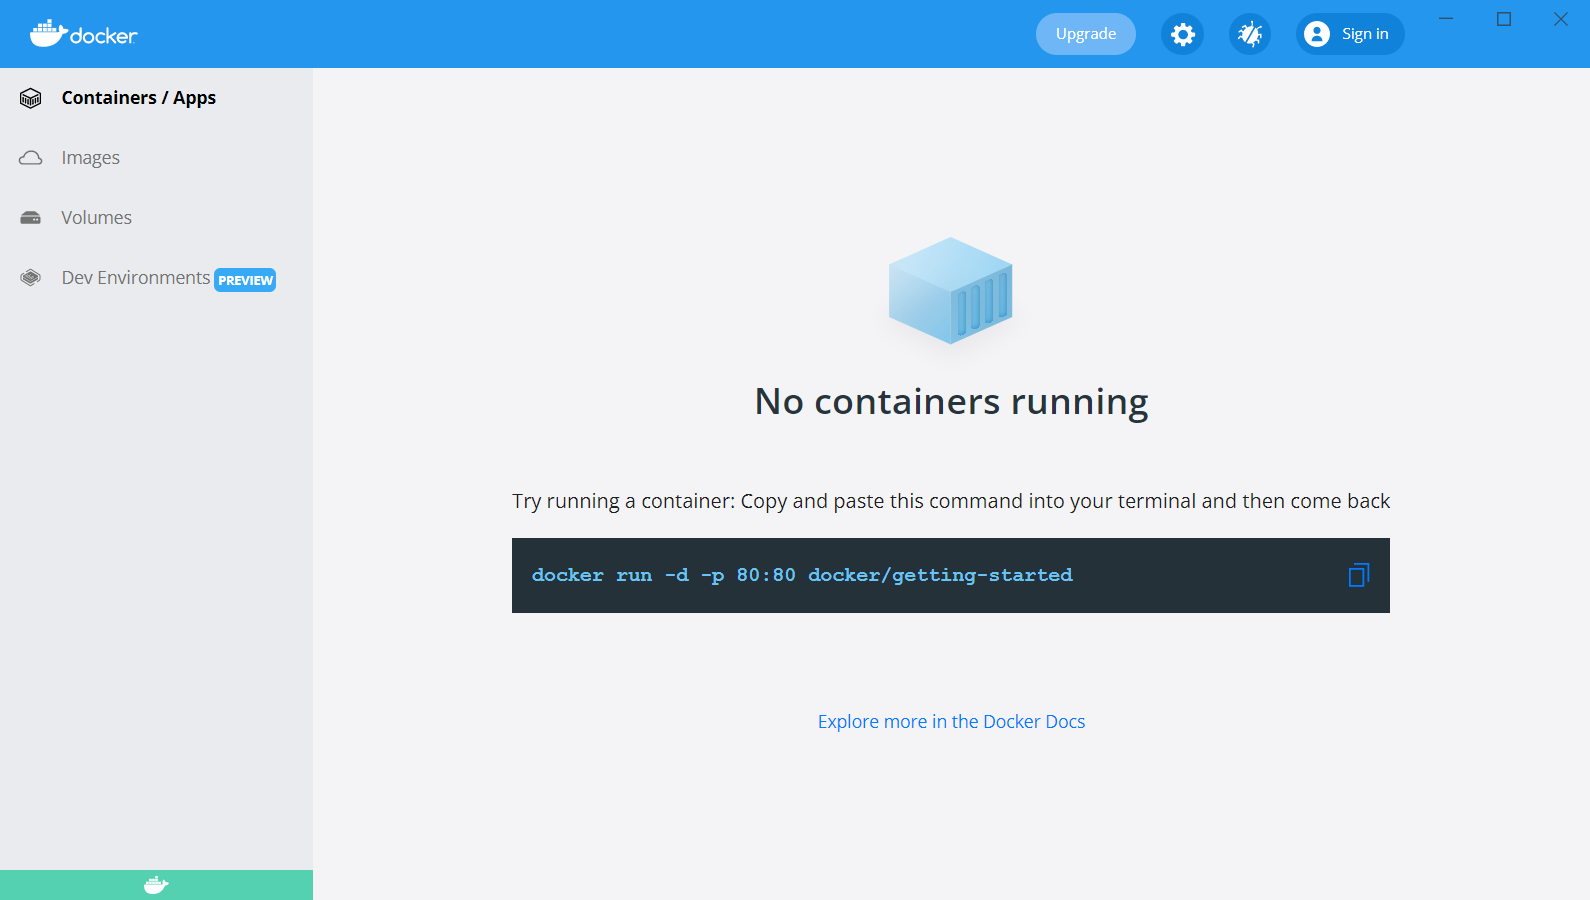
安装完 Docker Desktop 并启动,界面提示我们运行 docker/getting-started 镜像:
// 尝试运行容器:将此命令复制并粘贴到您的终端,然后返回
Try running a container: Copy and paste this command into your terminal and then come back

docker run -d -p 80:80 docker/getting-started
Tip:可以组合单个字符标志来缩短完整命令。等同于 docker run -dp 80:80 docker/getting-started
-d以分离模式运行容器(在后台)-p80:80将主机的 80 端口映射到容器中的 80 端口docker/getting-started要使用的镜像
根据提示,直接运行命令:
exercise> docker run -d -p 80:80 docker/getting-started
// 无法在本地找到镜像 'docker/getting-started:latest'
Unable to find image 'docker/getting-started:latest' locally
// 拉取 latest 版本
latest: Pulling from docker/getting-started
59bf1c3509f3: Pull complete
8d6ba530f648: Pull complete
5288d7ad7a7f: Pull complete
39e51c61c033: Pull complete
ee6f71c6f4a8: Pull complete
f2303c6c8865: Pull complete
0645fddcff40: Pull complete
d05ee95f5d2f: Pull complete
Digest: sha256:aa945bdff163395d3293834697fa91fd4c725f47093ec499f27bc032dc1bdd16
Status: Downloaded newer image for docker/getting-started:latest
8b755ccaba10653299afbb15c39c9a9c798c78ac1f7d90803794b77816495a9f
docker run 会创建容器,然后启动容器。如果本地没有该镜像,则会去拉取镜像:
exercise> docker image ls
REPOSITORY               TAG       IMAGE ID       CREATED        SIZE
docker/getting-started   latest    bd9a9f733898   9 days ago     28.8MB
hello-world              latest    feb5d9fea6a5   4 months ago   13.3kB
镜像为 docker/getting-started 的容器已经启动:
exercise> docker ps
CONTAINER ID   IMAGE                    COMMAND                  CREATED          STATUS          PORTS                NAMES
8b755ccaba10   docker/getting-started   "/docker-entrypoint.…"   11 seconds ago   Up 10 seconds   0.0.0.0:80->80/tcp   determined_sutherland
现在通过浏览器访问 http://localhost:80(自动跳转至 tutorial) 显示如下:
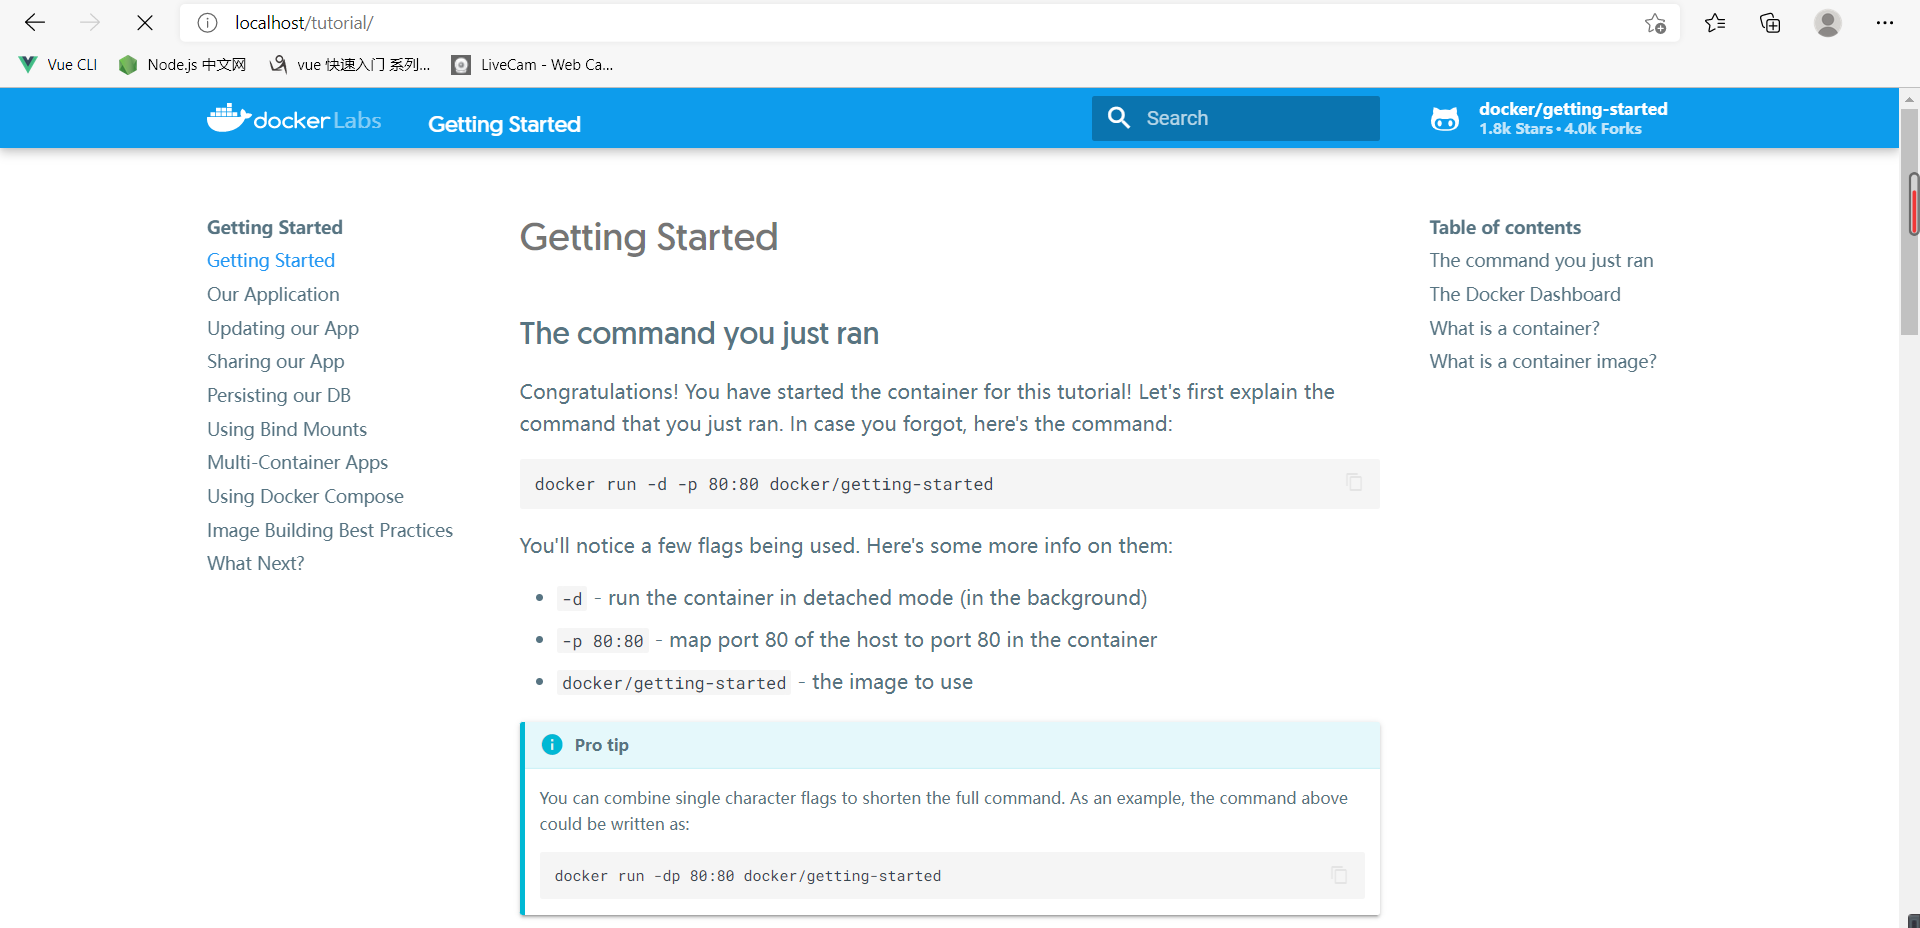
Tip:这个应用是一个教程,比如目录 Our Application,里面是一个 todo 的项目,教我们如何构建镜像。还有 Using Docker Compose、Persisting our DB(持久化我们的数据库)等。
停止、启动容器
可以通过 docker stop 和 docker start 来停止、启动容器:
exercise> docker stop 8b755ccaba10
8b755ccaba10
exercise> docker start 8b755ccaba10
8b755ccaba10
docker kill 也会停止容器,或许较 stop 更暴力:
exercise> docker start 8b755ccaba10
8b755ccaba10

exercise> docker ps  -a
// 容器还存在
CONTAINER ID   IMAGE                    COMMAND                  CREATED          STATUS                        PORTS     NAMES
8b755ccaba10   docker/getting-started   "/docker-entrypoint.…"   17 minutes ago   Exited (137) 11 seconds ago             determined_sutherland
构建镜像
笔者尝试将一个 node+express 的小项目打包成镜像。只需要两步:
- 创建前端项目
- 编写 Dockerfile 文件 —— 一个基于文本的指令脚本,用于创建容器镜像
创建前端项目
// 创建项目 node-server
exercise> mkdir node-server

// 进入项目
exercise> cd .\node-server\

// 初始化项目
node-server> npm init -y

// 安装依赖包
node-server> npm i -D express@4
创建 app.js,内容如下:
// node-server/app.js
const express = require('express')
const app = express()
const port = 3000

app.get('/', (req, res) => {
    res.send('Hello World!')
})

app.listen(port, () => {
    console.log(`Example app listening at http://localhost:${port}`)
})
Tip:express 更多介绍请看 快速入门-hello-world
启动服务,浏览器输出 Hello World!:
node-server> node app
Example app listening at http://localhost:3000
至此,前端项目编写完毕。
编写 Dockerfile 文件
新建 Dockerfile 文件:
// node-server/Dockerfile
// 注:文件没有扩展名

# Dockerfile 必须以 FROM 指令开头
# 为后续指令设置基本镜像
FROM node:14

# 定义变量 port、dir。引用则使用 $port
ENV port=3000
ENV dir=/app

# 设置工作目录
# 为 Dockerfile 中任何 RUN、CMD、ENTRYPOINT、COPY 和 ADD 指令设置工作目录
WORKDIR $dir

# 将当前的项目(如 app.js、package.json等文件目录)复制到 WORKDIR 中
COPY . .

# 运行命令 npm i
# `docker build` 时就会执行
RUN npm i

# EXPOSE 指令通知 Docker 容器在运行时侦听指定的网络端口。
# 可以指定端口监听 TCP 还是 UDP,如果不指定协议,则默认为 TCP。
# EXPOSE 指令实际上并不发布端口。要在运行容器时实际发布端口,请使用 docker run 上的 -p 标志
EXPOSE $port

# CMD 在构建时不会执行任何操作
CMD node app
Tip:本地 node 版本是 14,所以基础镜像也选择 14:
node-server> node -v
v14.17.6
新建 .dockerignore 文件:
// node-server/.dockerignore
// 忽略 node_modules 和 dist
node_modules
dist
Tip:.dockerignore 作用类似 git 中的 .gitignore 文件。有助于避免不必要地将大型或敏感文件和目录发送到守护程序。
通过 docker build 构建镜像:
-t给镜像起个名字- 末尾的
.告诉 Docker 应该在当前目录中查找 Dockerfile
node-server> docker build -t docker-node-server .
[+] Building 65.0s (9/9) FINISHED
 => [internal] load build definition from Dockerfile                                                                       0.1s
 => => transferring dockerfile: 756B                                                                                       0.0s
 => [internal] load .dockerignore                                                                                          0.0s
 => => transferring context: 58B                                                                                           0.0s
 => [internal] load metadata for docker.io/library/node:14                                                                 7.0s
 => [1/4] FROM docker.io/library/node:14@sha256:b2c75df8c9706156c38b4f1f678d00e11cb2bfda09fc4ab6e36ec17ac9163865          53.2s
 => => resolve docker.io/library/node:14@sha256:b2c75df8c9706156c38b4f1f678d00e11cb2bfda09fc4ab6e36ec17ac9163865           0.0s
 => => sha256:28874e89b1ebebe12162aed108a8b4b37f9e0326a58830d1fe54418f0167cad0 2.21kB / 2.21kB                             0.0s
 => => sha256:9cb3f042a68426bdefb8eba9bc173bdab3121c897397843ffc130b909dd86e4b 7.64kB / 7.64kB                             0.0s
 => => sha256:57b3fa6f1b88b95ac6adeafdb618011e672d4c9f5637b92be373276ee7e066dd 11.30MB / 11.30MB                          18.3s
 => => sha256:b2c75df8c9706156c38b4f1f678d00e11cb2bfda09fc4ab6e36ec17ac9163865 776B / 776B                                 0.0s
 => => sha256:a834d7c95167a3e129adb00a5ddbaf5d3c035ad748ff7ee1273373d150457820 45.38MB / 45.38MB                          10.8s
 => => sha256:778df3ecaa0fbba90d3a7d88947a4376ebdc7e2fcf8a4b5ce43b3c699faadff6 4.34MB / 4.34MB                             3.4s
 => => sha256:d353c340774e155d838e2e0f0952201366cee28591b065b7d328fde7bc72e034 49.76MB / 49.76MB                          28.9s
 => => sha256:6370e0bc373dd8f1f4b0f763cdd52ff8efbe34c82030a0a8d2ced521eb68d4f3 214.46MB / 214.46MB                        38.7s
 => => extracting sha256:a834d7c95167a3e129adb00a5ddbaf5d3c035ad748ff7ee1273373d150457820                                  2.8s
 => => sha256:fb61153482cddb011062662e1d09f1b57807ae219ec6688c5051fc2568f68a3d 4.19kB / 4.19kB                            21.4s
 => => extracting sha256:57b3fa6f1b88b95ac6adeafdb618011e672d4c9f5637b92be373276ee7e066dd                                  0.6s
 => => extracting sha256:778df3ecaa0fbba90d3a7d88947a4376ebdc7e2fcf8a4b5ce43b3c699faadff6                                  0.2s
 => => sha256:78fb5822e501465f53376aad93747f94d3730e708b5e36bb6494161e9c91f21e 35.60MB / 35.60MB                          45.2s
 => => sha256:ba3577a691be8618aafc9ae198e876b57871a492c855035db630e5f15e1f5c52 2.33MB / 2.33MB                            32.6s
 => => extracting sha256:d353c340774e155d838e2e0f0952201366cee28591b065b7d328fde7bc72e034                                  3.8s
 => => sha256:bd38fd0dd57b911346484e7fc692f9473d12488b1425b47be379951c0e12c31f 465B / 465B                                33.2s
 => => extracting sha256:6370e0bc373dd8f1f4b0f763cdd52ff8efbe34c82030a0a8d2ced521eb68d4f3                                 11.2s
 => => extracting sha256:fb61153482cddb011062662e1d09f1b57807ae219ec6688c5051fc2568f68a3d                                  0.1s
 => => extracting sha256:78fb5822e501465f53376aad93747f94d3730e708b5e36bb6494161e9c91f21e                                  2.3s
 => => extracting sha256:ba3577a691be8618aafc9ae198e876b57871a492c855035db630e5f15e1f5c52                                  0.1s
 => => extracting sha256:bd38fd0dd57b911346484e7fc692f9473d12488b1425b47be379951c0e12c31f                                  0.0s
 => [internal] load build context                                                                                          0.1s
 => => transferring context: 35.28kB                                                                                       0.0s
 => [2/4] WORKDIR /app                                                                                                     0.5s
 => [3/4] COPY . .                                                                                                         0.0s
 => [4/4] RUN npm i                                                                                                        4.1s
 => exporting to image                                                                                                     0.1s
 => => exporting layers                                                                                                    0.1s
 => => writing image sha256:b22b98e4c926dc10f96bf41f1e93626a8b7449a1a0e5399755a86c20b666f97b                               0.0s
 => => naming to docker.io/library/docker-node-server                                                                      0.0s

Use 'docker scan' to run Snyk tests against images to find vulnerabilities and learn how to fix them
构建一共花费 65 秒。新的镜像成功生成:
exercise> docker image ls
REPOSITORY               TAG       IMAGE ID       CREATED              SIZE
docker-node-server       latest    b22b98e4c926   About a minute ago   948MB
docker/getting-started   latest    bd9a9f733898   9 days ago           28.8MB
hello-world              latest    feb5d9fea6a5   4 months ago         13.3kB
运行新的镜像:
exercise> docker run -dp 3010:3000 docker-node-server
85b083215882cc74e8def49b2027c9b53a38ab827614701d0e0d38afb534dbbacd
查看正在运行的镜像:
exercise> docker ps
CONTAINER ID   IMAGE                    COMMAND                  CREATED          STATUS         PORTS                    NAMES
85b083215882   docker-node-server       "docker-entrypoint.s…"   11 seconds ago   Up 9 seconds   0.0.0.0:3010->3000/tcp   focused_lovelace
8b755ccaba10   docker/getting-started   "/docker-entrypoint.…"   5 hours ago      Up 4 hours     0.0.0.0:80->80/tcp       determined_sutherland
访问 http://localhost:3010/,浏览器显示 Hello World!。
Tip:运行镜像倘若改为 3010:3020,浏览器访问则会失败,因为镜像中暴露(EXPOSE)的端口为 3000。
开发、运维的视角
开发,更多关注与应用相关的内容
运维,主要包括下载镜像、运行新的容器、登录新容器、在容器内运行命令、销毁容器