1.用户定义
在前面的案例中,我们的登录用户是基于配置文件来配置的(本质是基于内存),但是在实际开发中,这种方式肯定是不可取的,在实际项目中,用户信息肯定要存入数据库之中。
Spring Security支持多种用户定义方式,接下来我们就逐个来看一下这些定义方式。通过前面的介绍(参见3小节),大家对于UserDetailsService以及它的子类都有了一定的了解, 自定义用户其实就是使用UserDetailsService的不同实现类来提供用户数据,同时将配置好的 UserDetailsService 配置给 AuthenticationManagerBuilder,系统再将 UserDetailsSeivice 提供给 AuthenticationProvider 使用,
1.1 基于内存
前面案例中用户的定义本质上还是基于内存,只是我们没有将InMemoryUserDetailsManager类明确抽出来自定义,现在我们通过自定义InMemoryUserDetailsManager来看一下基于内存的用户是如何自定义的。
重写 WebSecurityConfigurerAdapter 类的 configure(AuthenticationManagerBuilder)方法,内容如下:
@Override
protected void configure(AuthenticationManagerBuilder auth) throws Exception {
    InMemoryUserDetailsManager manager = new InMemoryUserDetailsManager();
    manager.createUser(User.withUsername("buretuzi").password("{noop}123456").roles("admin").build());
    manager.createUser(User.withUsername("sang").password("{noop}123").roles("user").build());
    auth.userDetailsService(manager);
}
首先构造了一个InMemoryUserDetailsManager实例,调用该实例的createUser方法来创建用户对象,我们在这里分别设置了用户名、密码以及用户角色。需要注意的是,用户密码加了 一个{noop}前缀,表示密码不加密,明文存储(关于密码加密问题,会在后面的章节中专门介绍)。
配置完成后,启动项目,此时就可以使用这里配置的两个用户登录了。
InMemoryUserDetailsManager 的实现原理很简单,它间接实现了 UserDetailsService 接口并重写了它里边的 loadUserByUsername方法,同时它里边维护了 一个HashMap变量,Map的 key 就是用户名,value则是用户对象,createUser就是往这个Map中存储数据,loadUserByUsername方法则是从该Map中读取数据,这里的源码比较简单,就不贴出来了,读者可以自行查看。
1.2 基于JdbcUserDetailsManager
JdbcUserDetailsManager支持将用户数据持久化到数据库,同时它封装了一系列操作用户的方法,例如用户的添加、更新、查找等。
Spring Security 中为 JdbcUserDetailsManager 提供了数据库脚本,位置在 org/springframework/security/core/userdetails/jdbc/users.ddl 内容如下:(注意将varchar_ignorecase改为varchar)
create table users(username varchar_ignorecase(50) not null primary key,
                   password varchar_ignorecase(500) not null,
                   enabled boolean not null);
create table authorities (username varchar_ignorecase(50) not null,
                          authority varchar_ignorecase(50) not null,
                          constraint fk_authorities_users foreign key(username) references users(username));
create unique index ix_auth_username on authorities (username,authority);
可以看到这里一共创建了两张表,users表就是存放用户信息的表,authorities则是存放用户角色的表。但是大家注意SQL的数据类型中有一个varchar_ignorecase,这个其实是针对 HSQLDB 的数据类型,我们这里使用的是MySQL数据库,所以这里手动将varchar_ignorecase 类型修改为varchar类型,然后去数据库中执行修改后的脚本。
另一方面,由于要将数据存入数据库中,所以我们的项目也要提供数据库支持, JdbcUserDetailsManager底层实际上是使用JdbcTemplate来完成的,所以这里主要添加两个依赖:
<dependency>
    <groupId>org.springframework.boot</groupId>
    <artifactId>spring-boot-starter-jdbc</artifactId>
</dependency>
<dependency>
    <groupId>mysql</groupId>
    <artifactId>mysql-connector-java</artifactId>
    <scope>runtime</scope>
</dependency>
然后在resources/application.yml中配置数据库连接信息:
spring:
  datasource:
    druid:
      driver-class-name: com.mysql.cj.jdbc.Driver
      url: jdbc:mysql://localhost:3306/springboot?useUnicode=true&characterEncoding=utf-8&serverTimezone=UTC&useSSL=true
      username: root
      password: 123456
配置完成后,我们重写WebSecurityConfigurerAdapter类的 configure(AuthenticationManagerBuilder auth)方法,内容如下(注意版本,不得低于以下版本):
<dependency>
    <groupId>org.springframework.security</groupId>
    <artifactId>spring-security-web</artifactId>
    <version>5.3.6.RELEASE</version>
</dependency>
<dependency>
    <groupId>org.springframework.security</groupId>
    <artifactId>spring-security-core</artifactId>
    <version>5.3.6.RELEASE</version>
</dependency>
package com.intehel.demo.config;
import org.springframework.beans.factory.annotation.Autowired;
import org.springframework.context.annotation.Configuration;
import org.springframework.security.config.annotation.authentication.builders.AuthenticationManagerBuilder;
import org.springframework.security.config.annotation.web.configuration.WebSecurityConfigurerAdapter;
import org.springframework.security.core.userdetails.User;
import org.springframework.security.provisioning.JdbcUserDetailsManager;
import javax.sql.DataSource;
@Configuration
public class SecurityConfig extends WebSecurityConfigurerAdapter {
@Autowired
DataSource dataSource;
@Override
protected void configure(AuthenticationManagerBuilder auth) throws Exception {
JdbcUserDetailsManager manager = new JdbcUserDetailsManager(dataSource);
if (!manager.userExists("buretuzi")){
manager.createUser(User.withUsername("buretuzi").password("{noop}123456").roles("admin").build());
}
if (!manager.userExists("song")){
manager.createUser(User.withUsername("sang").password("{noop}123").roles("user").build());
}
auth.userDetailsService(manager);
}
}- 当引入spring-boot-starter-jdbc并配置了数据库连接信息后,一个DataSource实例就有了,这里首先引入DataSource实例。
- 在 configure 方法中,创建一个 JdbcUserDetailsManager 实例,在创建时传入 DataSource 实例。通过userExists方法可以判断一个用户是否存在,该方法本质上就是去数据库中査询对应的用户;如果用户不存在,则通过createUser方法可以创建一个用户,该方法本质上就是向数据库中添加一个用户。
- 最后将manager实例设置到auth对象中。
配置完成后,重启项目,如果项目启动成功,数据库中就会自动添加进来两条数据,如图2-22、图2-23所示。
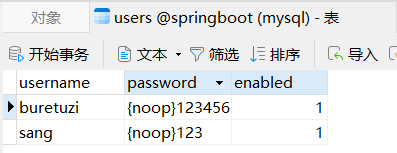
图 2-22
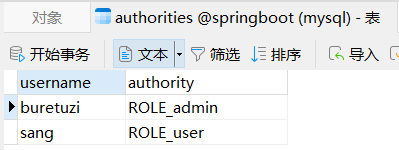
图 2-23
此时,我们就可以使用buretuzi/123456,sang/123进行登录测试了。
在 JdbcUserDetailsManager 的继承体系中,首先是 JdbcDaoImpl 实现了 UserDetailsService 接口,并实现了基本的loadUserByUsername方法,JdbcUserDetailsManager则继承自 JdbcDaoImpl,同时完善了数据库操作,又封装了用户的增删改査方法,这里,我们以 loadUserByUsername为例,看一下源码,其余的增删改操作相对来说都比较容易,这里就不再赘述了。
JdbcDaoImpl#loadUserByUsername:
public class JdbcDaoImpl extends JdbcDaoSupport implements UserDetailsService, MessageSourceAware {
    public static final String DEF_USERS_BY_USERNAME_QUERY = "select username,password,enabled from users where username = ?";
    public static final String DEF_AUTHORITIES_BY_USERNAME_QUERY = "select username,authority from authorities where username = ?";
    public static final String DEF_GROUP_AUTHORITIES_BY_USERNAME_QUERY = "select g.id, g.group_name, ga.authority from groups g, group_members gm, group_authorities ga where gm.username = ? and g.id = ga.group_id and g.id = gm.group_id";
    protected MessageSourceAccessor messages = SpringSecurityMessageSource.getAccessor();
    private String authoritiesByUsernameQuery = "select username,authority from authorities where username = ?";
    private String groupAuthoritiesByUsernameQuery = "select g.id, g.group_name, ga.authority from groups g, group_members gm, group_authorities ga where gm.username = ? and g.id = ga.group_id and g.id = gm.group_id";
    private String usersByUsernameQuery = "select username,password,enabled from users where username = ?";
    private String rolePrefix = "";
    private boolean usernameBasedPrimaryKey = true;
    private boolean enableAuthorities = true;
    private boolean enableGroups;

    public UserDetails loadUserByUsername(String username) throws UsernameNotFoundException {
        List<UserDetails> users = this.loadUsersByUsername(username);
        if (users.size() == 0) {
            this.logger.debug("Query returned no results for user '" + username + "'");
            throw new UsernameNotFoundException(this.messages.getMessage("JdbcDaoImpl.notFound", new Object[]{username}, "Username {0} not found"));
        } else {
            UserDetails user = (UserDetails)users.get(0);
            Set<GrantedAuthority> dbAuthsSet = new HashSet();
            if (this.enableAuthorities) {
                dbAuthsSet.addAll(this.loadUserAuthorities(user.getUsername()));
            }

            if (this.enableGroups) {
                dbAuthsSet.addAll(this.loadGroupAuthorities(user.getUsername()));
            }

            List<GrantedAuthority> dbAuths = new ArrayList(dbAuthsSet);
            this.addCustomAuthorities(user.getUsername(), dbAuths);
            if (dbAuths.size() == 0) {
                this.logger.debug("User '" + username + "' has no authorities and will be treated as 'not found'");
                throw new UsernameNotFoundException(this.messages.getMessage("JdbcDaoImpl.noAuthority", new Object[]{username}, "User {0} has no GrantedAuthority"));
            } else {
                return this.createUserDetails(username, user, dbAuths);
            }
        }
    }

    protected List<UserDetails> loadUsersByUsername(String username) {
        return this.getJdbcTemplate().query(this.usersByUsernameQuery, new String[]{username}, (rs, rowNum) -> {
            String username1 = rs.getString(1);
            String password = rs.getString(2);
            boolean enabled = rs.getBoolean(3);
            return new User(username1, password, enabled, true, true, true, AuthorityUtils.NO_AUTHORITIES);
        });
    }
}- 首先根据用户名,调用loadUserByUsername方法去数据库中查询用户,查询出来的是一个List集合,集合中如果没有数据,说明用户不存在,则直接抛出异常,
- 如果集合中存在数据,则将集合中的第一条数据拿出来,然后再去查询用户角色, 最后根据这些信息创建一个新的UserDetails出来。
- 需要注意的是,这里还引入了分组的概念,不过考虑到JdbcUserDetailsManager并非我们实际项目中的主流方案,因此这里不做过多介绍。
这就是使用JdbcUserDetailsManager做数据持久化。这种方式看起来简单,都不用开发者自己写SQL,但是局限性比较大,无法灵活地定义用户表、角色表等,而在实际开发中,我们还是希望能够灵活地掌控数据表结构,因此JdbcUserDetailsManager使用场景非常有限。
1.3 基于 MyBatis
使用MyBatis做数据持久化是目前大多数企业应用釆取的方案,Spring Security中结合 MyBatis可以灵活地定制用户表以及角色表,我们对此进行详细介绍。
首先需要设计三张表,分别是用户表、角色表以及用户角色关联表,三张表的关系如图 2-24所示。

图 2-24
用户和角色是多对多的关系,我们使用user_role来将两者关联起来。 数据库脚本如下:
CREATE TABLE `role`(
	`id` INT(11) NOT NULL AUTO_INCREMENT,
	`name` VARCHAR(32) DEFAULT NULL,
	`nameZh` VARCHAR(32) DEFAULT NULL,
	PRIMARY KEY(`id`)
)ENGINE=INNODB DEFAULT CHARSET=utf8

CREATE TABLE `user` (
	`id` INT(11) NOT NULL AUTO_INCREMENT,
	`username` VARCHAR(32) DEFAULT NULL,
	`password` VARCHAR(255) DEFAULT NULL,
	`enabled` TINYINT(1) DEFAULT NULL,
	`accountNonExpired` TINYINT(1) DEFAULT NULL,
	`accountNonLocked` TINYINT(1) DEFAULT NULL,
	`credentialsNonExpired` TINYINT(1) DEFAULT NULL,
	PRIMARY KEY(`id`)
)ENGINE=INNODB DEFAULT CHARSET=utf8

CREATE TABLE `user_role`(
	`id` INT(11) NOT NULL AUTO_INCREMENT,
	`uid` INT(11) DEFAULT NULL,
	`rid` INT(11) DEFAULT NULL,
	PRIMARY KEY(`id`),
	KEY `uid` (`uid`),
	KEY `rid` (`rid`)
)ENGINE=INNODB DEFAULT CHARSET=utf8
对于角色表,三个字段从上往下含义分别为角色id、角色英文名称以及角色中文名称, 对于用户表,七个字段从上往下含义依次为:用户id、用户名、用户密码、账户是否可用、账户是否没有过期、账户是否没有锁定以及凭证(密码)是否没有过期。
数据库创建完成后,可以向数据库中添加几条模拟数据,代码如下:
INSERT INTO `role` (`id`,`name`,`nameZh`)
VALUES
	(1,'ROLE_dba','数据库管理员'),
	(2,'ROLE_admin','系统管理员'),
	(3,'ROLE_user','用户');

INSERT INTO `user` (`id`,`username`,`password`,`enabled`,`accountNonExpired`,`accountNonLocked`,`credentialsNonExpired`)
VALUES
	(1,'root','{noop}123',1,1,1,1),
	(2,'admin','{noop}123',1,1,1,1),
	(3,'sang','{noop}123',1,1,1,1);

INSERT INTO `user_role` (`id`,`uid`,`rid`)
VALUES
	(1,1,1),
	(2,1,2),
	(3,2,2),
	(4,3,3);
这样,数据库的准备工作就算完成了。
在Spring Security项目中,我们需要引入MyBatis和MySQL依赖,代码如下:
<dependency>
    <groupId>org.mybatis.spring.boot</groupId>
    <artifactId>mybatis-spring-boot-starter</artifactId>
    <version>2.2.2</version>
</dependency>
<dependency>
    <groupId>mysql</groupId>
    <artifactId>mysql-connector-java</artifactId>
    <scope>runtime</scope>
</dependency>
同时在resources/application.yml中配置数据库基本连接信息:
spring:
  datasource:
    druid:
      driver-class-name: com.mysql.cj.jdbc.Driver
      url: jdbc:mysql://localhost:3306/springboot?useUnicode=true&characterEncoding=utf-8&serverTimezone=UTC&useSSL=true
      username: root
      password: 123456
接下来创建用户类和角色类:
package com.intehel.demo.domain;

import org.springframework.security.core.GrantedAuthority;
import org.springframework.security.core.authority.SimpleGrantedAuthority;
import org.springframework.security.core.userdetails.UserDetails;
import java.util.ArrayList;
import java.util.Collection;
import java.util.List;
import lombok.Data;

@Data
public class User implements UserDetails {
    private Integer id;
    private String username;
    private String password;
    private Boolean enabled;
    private Boolean accountNonExpired;
    private Boolean accountNonLocked;
    private Boolean credentialsNonExpired;
    private List<Role> roles = new ArrayList<Role>();
    @Override
    public Collection<? extends GrantedAuthority> getAuthorities() {
        List<SimpleGrantedAuthority> authorities = new ArrayList<>();
        for (Role role : roles) {
            authorities.add(new SimpleGrantedAuthority(role.getName()));
        }
        return authorities;
    }
    @Override
    public boolean isAccountNonExpired() {
        return accountNonExpired;
    }
    @Override
    public boolean isAccountNonLocked() {
        return accountNonLocked;
    }
    @Override
    public boolean isCredentialsNonExpired() {
        return credentialsNonExpired;
    }
    @Override
    public boolean isEnabled() {
        return enabled;
    }
}
package com.intehel.demo.domain;
import lombok.Data;
@Data
public class Role {
    private Integer id;
    private String name;
    private String nameZh;
}
自定义用户类需要实现UserDetails接口,并实现接口中的方法,这些方法的含义我们在 3小节中已经介绍过了,这里不再赘述。其中roles属性用来保存用户所具备的角色信息, 由于系统获取用户角色调用的方法是getAuthorities,所以我们在getAuthorities方法中,将roles 中的角色转为系统可识别的对象并返回。
接下来我们自定义UserDetailsService以及对应的数据库查询方法:
package com.intehel.demo.mapper;

import com.intehel.demo.domain.Role;
import com.intehel.demo.domain.User;
import org.apache.ibatis.annotations.Mapper;
import java.util.List;

@Mapper
public interface UserMapper{
    List<Role> getRolesByUid(Integer id);
    User loadUserByUsername(String username);
}
package com.intehel.demo.service;
import com.intehel.demo.domain.User;
import com.intehel.demo.mapper.UserMapper;
import org.springframework.beans.factory.annotation.Autowired;
import org.springframework.security.core.userdetails.UserDetails;
import org.springframework.security.core.userdetails.UserDetailsService;
import org.springframework.security.core.userdetails.UsernameNotFoundException;
public class MyUserDetailsService implements UserDetailsService {
@Autowired
UserMapper userMapper;
@Override
public UserDetails loadUserByUsername(String username) throws UsernameNotFoundException {
User user = userMapper.loadUserByUsername(username);
if (user == null) {
throw new UsernameNotFoundException("用户不存在");
}
user.setRoles(userMapper.getRolesByUid(user.getId()));
return user;
}
}自定义 MyUserDetailsService实现UserDetailsService接口,并实现该接口中的方法。 loadUserByUsername方法经过前面章节的讲解,相信大家已经很熟悉了,该方法就是根据用户名去数据库中加载用户,如果从数据库中没有査到用户,则抛出UsernameNotFoundException 异常;如果査询到用户了,则给用户设置roles属性。
UserMapper中定义两个方法用于支持MyUserDetailsService中的査询操作。
最后,在UserMapper.xml中定义查询SQL,代码如下:
<?xml version="1.0" encoding="UTF-8"?>
<!DOCTYPE mapper PUBLIC "-//mybatis.org//DTD Mapper 3.0//EN"
        "http://mybatis.org/dtd/mybatis-3-mapper.dtd">
<mapper namespace="com.intehel.demo.mapper.UserMapper">
    <select id="loadUserByUsername" resultType="com.intehel.demo.domain.User">
        select * from `user` where username = #{username}
    </select>

    <select id="loadUserByUsername" resultType="com.intehel.demo.domain.Role">
        select r.* from role r,user_role ur where r.`id`=ur.`rid`
    </select>
</mapper>
将mylogin.html放在 resources/templates/ 下,mylogin.html如下
查看代码
 <!DOCTYPE html>
<html lang="en" xmlns:th="http://www.thymeleaf.org">
<head>
    <meta charset="UTF-8">
    <title>登录</title>
    <link href="//maxcdn.bootstrapcdn.com/bootstrap/4.1.1/css/bootstrap.min.css" rel="stylesheet" id="bootstrap-css">
    <script src="//maxcdn.bootstrapcdn.com/bootstrap/4.1.1/js/bootstrap.min.js"></script>
    <script src="//cdnjs.cloudflare.com/ajax/libs/jquery/3.2.1/jquery.min.js"></script>
</head>
<style>
    #login .container #login-row #login-column #login-box {
        border: 1px solid #9c9c9c;
        background-color: #EAEAEA;
    }
</style>
<body>
<div id="login">
    <div class="container">
        <div id="login-row" class="row justify-content-center align-items-center">
            <div id="login-column" class="col-md-6">
                <div id="login-box" class="col-md-12">
                    <form id="login-form" class="form" action="/doLogin" method="post">
                        <h3 class="text-center text-info">登录</h3>
                        <!--/*@thymesVar id="SPRING_SECURITY_LAST_EXCEPTION" type="com"*/-->
                        <div th:text="${SPRING_SECURITY_LAST_EXCEPTION}"></div>
                        <div class="form-group">
                            <label for="username" class="text-info">用户名:</label><br>
                            <input type="text" name="uname" id="username" class="form-control">
                        </div>
                        <div class="form-group">
                            <label for="password" class="text-info">密码:</label><br>
                            <input type="text" name="passwd" id="password" class="form-control">
                        </div>
                        <div class="form-group">
                            <input type="submit" name="submit" class="btn btn-info btn-md" value="登录">
                        </div>
                    </form>
                </div>
            </div>
        </div>
    </div>
</div>
</body>
</html>
为了方便,我们将UserMapper.xml文件放在resources/mapper下,UsetMapper接口放在mapper包下。为了防止 Maven打包时自动忽略了 XML文件,还需要在application.yml中添加mapper-locations配置:
查看代码
# 应用名称
spring:
  datasource:
    druid:
      driver-class-name: com.mysql.cj.jdbc.Driver
      url: jdbc:mysql://localhost:3306/springboot?useUnicode=true&characterEncoding=utf-8&serverTimezone=UTC&useSSL=true
      username: root
      password: 123456
  security:
    user:
      name: buretuzi
      password: 123456
  application:
    name: demo
  thymeleaf:
    mode: HTML
    encoding: UTF-8
    servlet:
      content-type: text/html
    cache: false
    prefix: classpath:/templates/

# 应用服务 WEB 访问端口
server:
  port: 8080
mybatis:
  # spring boot集成mybatis的方式打印sql
  mapper-locations: classpath:/mapper/*.xml
  configuration:
    log-impl: org.apache.ibatis.logging.stdout.StdOutImpl
最后一步,就是在 SecurityConfig 中注入 UserDetailsService:
查看代码
 package com.intehel.demo.config;

import com.fasterxml.jackson.databind.ObjectMapper;
import com.intehel.demo.handler.MyAuthenticationFailureHandler;
import com.intehel.demo.service.MyUserDetailsService;
import org.springframework.beans.factory.annotation.Autowired;
import org.springframework.context.annotation.Configuration;
import org.springframework.security.config.annotation.authentication.builders.AuthenticationManagerBuilder;
import org.springframework.security.config.annotation.web.builders.HttpSecurity;
import org.springframework.security.config.annotation.web.configuration.WebSecurityConfigurerAdapter;
import org.springframework.security.core.userdetails.User;
import org.springframework.security.provisioning.JdbcUserDetailsManager;
import org.springframework.security.web.util.matcher.AntPathRequestMatcher;
import org.springframework.security.web.util.matcher.OrRequestMatcher;
import javax.sql.DataSource;
import java.util.HashMap;
import java.util.Map;

@Configuration
public class SecurityConfig extends WebSecurityConfigurerAdapter {
    @Autowired
    MyUserDetailsService myUserDetailsService;
    @Override
    protected void configure(HttpSecurity http) throws Exception {
        http.authorizeRequests()
                .anyRequest().authenticated()
                .and()
                .formLogin()
                .loginPage("/mylogin.html")
                .loginProcessingUrl("/doLogin")
                .defaultSuccessUrl("/index.html")
                .failureHandler(new MyAuthenticationFailureHandler())
                .usernameParameter("uname")
                .passwordParameter("passwd")
                .permitAll()
                .and()
                .logout()
                .logoutRequestMatcher(new OrRequestMatcher(new AntPathRequestMatcher("/logout1","GET"),
                        new AntPathRequestMatcher("/logout2","POST")))
                .invalidateHttpSession(true)
                .clearAuthentication(true)
                .defaultLogoutSuccessHandlerFor((req,resp,auth)->{
                    resp.setContentType("application/json;charset=UTF-8");
                    Map<String,Object> result = new HashMap<String,Object>();
                    result.put("status",200);
                    result.put("msg","使用logout1注销成功!");
                    ObjectMapper om = new ObjectMapper();
                    String s = om.writeValueAsString(result);
                    resp.getWriter().write(s);
                },new AntPathRequestMatcher("/logout1","GET"))
                .defaultLogoutSuccessHandlerFor((req,resp,auth)->{
                    resp.setContentType("application/json;charset=UTF-8");
                    Map<String,Object> result = new HashMap<String,Object>();
                    result.put("status",200);
                    result.put("msg","使用logout2注销成功!");
                    ObjectMapper om = new ObjectMapper();
                    String s = om.writeValueAsString(result);
                    resp.getWriter().write(s);
                },new AntPathRequestMatcher("/logout1","GET"))
                .and()
                .csrf().disable();
    }
    @Override
    protected void configure(AuthenticationManagerBuilder auth) throws Exception {
        auth.userDetailsService(myUserDetailsService);
    }
}
配置UserDetailsService的方式和前面配置JdbcUserDetailsManager的方式基本一致,只不过配置对象变成了 myUserDetailsService而己。至此,整个配置工作就完成了。
接下来启动项目,利用数据库中添加的模拟用户进行登录测试,就可以成功登录了,测试方式和前面章节一致,这里不再赘述。
1.4 基于 Spring Data JPA
考虑到在Spring Boot技术栈中也有不少人使用Spring Data JPA,因此这里针对Spring Security+Spring Data JPA也做一个简单介绍,具体思路和基于MyBatis的整合类似。
首先引入Spring Data JPA的依赖和MySQL依赖:
<dependency>
    <groupId>org.springframework.boot</groupId>
    <artifactId>spring-boot-starter-data-jpa</artifactId>
</dependency>
<dependency>
    <groupId>mysql</groupId>
    <artifactId>mysql-connector-java</artifactId>
    <scope>runtime</scope>
</dependency>
然后在resources/application.yml中配置数据库和JPA,代码如下:
spring:
  datasource:
    druid:
      driver-class-name: com.mysql.cj.jdbc.Driver
      url: jdbc:mysql://localhost:3306/springboot?useUnicode=true&characterEncoding=utf-8&serverTimezone=UTC&useSSL=true
      username: root
      password: 123456
  jpa:
    database: mysql
    database-platform: mysql
    hibernate:
      ddl-auto: update
    show-sql: true
    properties:
      hibernate:
        dialect: org.hibernate.dialect.Mysql8Dialect
据库的配置还是和以前一样,JPA的配置则主要配置了数据库平台,数据表更新方式、 是否打印SQL以及对应的数据库方言。
使用Spring Data JPA的好处是我们不用提前准备SQL脚本,所以接下来配置两个数据库实体类即可:
package com.intehel.demo.domain;

import lombok.Data;
import org.springframework.security.core.GrantedAuthority;
import org.springframework.security.core.authority.SimpleGrantedAuthority;
import org.springframework.security.core.userdetails.UserDetails;
import javax.persistence.*;
import java.util.ArrayList;
import java.util.Collection;
import java.util.List;

@Entity
@Data
public class User implements UserDetails {
    @Id
    @GeneratedValue(strategy = GenerationType.IDENTITY)
    private long id;
    private String username;
    private String password;
    private Boolean enabled;
    private Boolean accountNonExpired;
    private Boolean accountNonLocked;
    private Boolean credentialsNonExpired;
    @ManyToMany(fetch = FetchType.EAGER,cascade = CascadeType.PERSIST)
    private List<Role> roles;
    @Override
    public Collection<? extends GrantedAuthority> getAuthorities() {
        List<SimpleGrantedAuthority> authorities = new ArrayList<>();
        for (Role role : roles) {
            authorities.add(new SimpleGrantedAuthority(role.getName()));
        }
        return authorities;
    }
    @Override
    public String getPassword() {
        return password;
    }
    @Override
    public String getUsername() {
        return username;
    }
    @Override
    public boolean isAccountNonExpired() {
        return accountNonExpired;
    }
    @Override
    public boolean isAccountNonLocked() {
        return accountNonLocked;
    }
    @Override
    public boolean isCredentialsNonExpired() {
        return credentialsNonExpired;
    }
    @Override
    public boolean isEnabled() {
        return enabled;
    }
}
package com.intehel.demo.domain;
import lombok.Data;
import javax.persistence.Entity;
import javax.persistence.GeneratedValue;
import javax.persistence.GenerationType;
import javax.persistence.Id;
@Data
@Entity(name = "role")
public class Role {
@Id
@GeneratedValue(strategy = GenerationType.IDENTITY)
private Integer id;
private String name;
private String nameZh;
}这两个实体类和前面MyBatis中实体类的配置类似,需要注意的是roles属性上多了一个 多对多配置。
接下来配置UserDetailsService,并提供数据查询方法:
package com.intehel.demo.dao;

import com.intehel.demo.domain.User;
import org.springframework.data.jpa.repository.JpaRepository;

public interface UserDao extends JpaRepository<User,Integer> {
    User findUserByUsername(String username);
}
package com.intehel.demo.Service;
import com.intehel.demo.dao.UserDao;
import com.intehel.demo.domain.User;
import org.springframework.beans.factory.annotation.Autowired;
import org.springframework.security.core.userdetails.UserDetails;
import org.springframework.security.core.userdetails.UserDetailsService;
import org.springframework.security.core.userdetails.UsernameNotFoundException;
import org.springframework.stereotype.Service;
@Service
public class MyUserDetailsService implements UserDetailsService {
@Autowired
UserDao userDao;
@Override
public UserDetails loadUserByUsername(String username) throws UsernameNotFoundException {
User user = userDao.findUserByUsername(username);
if (user == null) {
throw new UsernameNotFoundException("用户不存在");
}
return user;
}
}MyUserDetailsService的定义也和前面的类似,不同之处在于数据查询方法的变化。定义 UserDao 继承自 JpaRepository,并定义一个 findUserByUsername 方法,剩下的事情 Spring Data JPA框架会帮我们完成。
最后,再在 SecurityConfig 中配置 MyUserDetailsService配置方式和 MyBatis 一模一样, 这里就不再把代码贴岀来了。使用了 Spring Data JPA之后,当项目启动时,会自动在数据库中创建相关的表,而不用我们自己去写脚本,这也是使用Spring Data JPA的方便之处。
为了测试方便,我们可以在单元测试中执行如下代码,向数据库中添加测试数据:
package com.intehel.demo;

import com.intehel.demo.dao.UserDao;
import com.intehel.demo.domain.Role;
import com.intehel.demo.domain.User;
import org.junit.jupiter.api.Test;
import org.springframework.beans.factory.annotation.Autowired;
import org.springframework.boot.test.context.SpringBootTest;
import java.util.ArrayList;
import java.util.List;

@SpringBootTest
class DemoApplicationTests {
    @Autowired
    UserDao userDao;
    @Test
    void contextLoads() {
        User user1 = new User();
        user1.setUsername("buretuzi");
        user1.setPassword("{noop}123");
        user1.setAccountNonExpired(true);
        user1.setAccountNonLocked(true);
        user1.setCredentialsNonExpired(true);
        user1.setEnabled(true);
        List<Role> roles = new ArrayList<>();
        Role r1 = new Role();
        r1.setName("ROLE_admin");
        r1.setNameZh("管理员");
        roles.add(r1);
        user1.setRoles(roles);
        userDao.save(user1);
    }

}
测试数据添加成功之后,接下来启动项目,使用测试数据进行登录测试,具体测试过程就不再赘述了。
至此,四种不同的用户定义方式就介绍完了。这四种方式,异曲同工,只是数据存储的方式不一样而已,其他的执行流程都是一样的