
1. 登录用户数据获取
登录成功之后,在后续的业务逻辑中,开发者可能还需要获取登录成功的用户对象,如果不使用任何安全管理框架,那么可以将用户信息保存在HttpSession中,以后需要的时候直接从HttpSession中获取数据。在Spring Security中,用户登录信息本质上还是保存在 HttpSession中,但是为了方便使用,Spring Security对HttpSession中的用户信息进行了封装, 封装之后,开发者若再想获取用户登录数据就会有两种不同的思路:
- 从 SecurityContextHolder 中获取
- 从当前请求对象中获取。
这里列出来的两种方式是主流的做法,开发者也可以使用一些非主流的方式获取登录成功后的用户信息,例如直接从HttpSession中获取用户登录数据,
无论是哪种获取方式,都离不开一个重要的对象:Authentication。在Spring Security中, Authentication对象主要有两方面的功能:
- 作为AuthenticationManager的输入参数,提供用户身份认证的凭证,当它作为一个 输入参数时,它的isAuthenticated方法返回false,表示用户还未认证。
- 代表已经经过身份认证的用户,此时的Authentication可以从SecurityContext中获取。
一个Authentication对象主要包含三个方面的信息:
- principal: 定义认证的用户。如果用户使用用户名/密码的方式登录,principal通常就是一个UserDetails对象。
- credentials:登录凭证,一般就是指密码。当用户登录成功之后,登录凭证会被自动擦除,以防止泄漏。
- authorities:用户被授予的权限信息。
Java中本身提供了 Principal接口用来描述认证主体,Principal可以代表一个公司、个人或者登录ID,Spring Security中定义了 Authentication接口用来规范登录用户信息, Authentication 继承自 Principal:
public interface Authentication extends Principal, Serializable {
	Collection<? extends GrantedAuthority> getAuthorities();
	Object getCredentials();
	Object getDetails();
	Object getPrincipal();
	boolean isAuthenticated();
	void setAuthenticated(boolean isAuthenticated) throws IllegalArgumentException;
}
这里接口中定义的方法都很好理解:
- getAuthorities方法:用来获取用户权限。
- getCredentials方法:用来获取用户凭证,一般来说就是密码。
- getDetails方法:用来获取用户的详细信息,可能是当前的请求之类。
- getPrincipal方法:用来获取当前用户信息,可能是一个用户名,也可能是一个用户对象。
- isAuthenticated方法:当前用户是否认证成功。
可以看到,在Spring Security中,只要获取到Authentication对象,就可以获取到登录用户的详细信息,
不同的认证方式对应不同的Authentication实例,Spring Security中的Authentication实现类如图2-11所示,
这些实现类现看起来可能会觉得陌生,不过没关系,在后续中,这些实现类基本上都会涉及,现在我们先对每个类的功能做一个大概介绍:
- AbstractAuthenticationToken:该类实现了 Authentication 和 CredentialsContainer 两个接口,在AbstractAuthenticationToken中对Authentication接口定义的各个数据获取方法进行了 实现,CredentialsContainer则提供了登录凭证擦除方法。一般在登录成功后,为了防止用户信 息泄漏,可以将登录凭证(例如密码)擦除。
- RememberMeAuthenticationToken:如果用户使用 RememberMe 的方式登录,登录信息将封装在 RememberMeAuthenticationToken中。
- TestingAuthenticationToken:单元测试时封装的用户对象口
- AnonymousAuthenticationToken:匿名登录时封装的用户对象。
- RunAsUserToken:替换验证身份时封装的用户对象。
- UsernamePasswordAuthenticationToken:表单登录时封装的用户对象。
- JaasAuthenticationToken: JAAS 认证时封装的用户对象。
- PreAuthenticatedAuthenticationToken: Pre-Authentication 场景下封装的用户对象。
在这些 Authentication 的实例中,最常用的有两个:UsernamePasswordAuthenticationToken 和RememberMeAuthenticationToken。在2中的案例对应的用户认证对象就是UsernamePasswordAuthenticationToken。
了解了 Authentication对象之后,接下来我们来看一下如何在登录成功后获取用户登录信 息,即 Authentication 对象。

图 2-11
1.1 从 SecurityContextHolder 中获取
添加一个UserController,内容如下:
package com.intehel.demo.controller;

import org.springframework.security.core.Authentication;
import org.springframework.security.core.GrantedAuthority;
import org.springframework.security.core.context.SecurityContextHolder;
import org.springframework.web.bind.annotation.GetMapping;
import org.springframework.web.bind.annotation.RestController;
import java.util.Collection;

@RestController
public class UserController {
    @GetMapping("/user")
    public void userinfo(){
        Authentication authentication = SecurityContextHolder.getContext().getAuthentication();
        String name = authentication.getName();
        Collection<? extends GrantedAuthority> authorities = authentication.getAuthorities();
        System.out.println("name = "+name);
        System.out.println("authorities = "+authorities);
    }
}
配置完成后,启动项目,登录成功后,访问/user接口,控制台就会打印出登录用户信息, 当然,由于我们目前没有给用户配置角色,所以默认的用户角色为空数组,如图2-12所示。
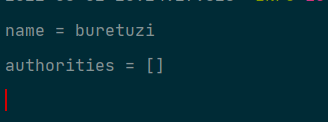
图 2-12
这里为了演示方便,我们在Controller中获取登录用户信息,可以发现,SecurityContextHolder.getContext()是一个静态方法,也就意味着我们随时随地都可以获取到登录用户信息,在service层也可以获取到登录用户信息(在实际项目中,大部分情况下也都是在service层获取登录用户信息)。
获取登录用户信息的代码很简单,那么SecuntyContextHolder到底是什么?它里边的数据又是从何而来的?接下来我们将进行一一解析。
1.1.1 SecurityContextHolder
SecurityContextHolder 中存储的是 SecurityContext,SecurityContext 中存储的则是 Authentication,三者的关系如图2-13所示。
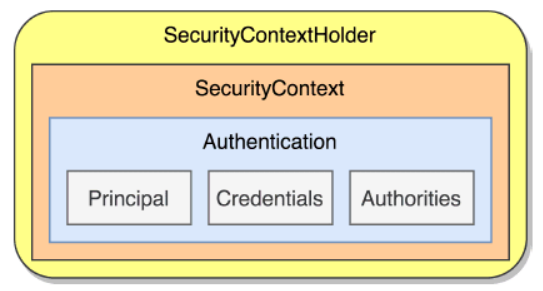
图 2-13
这幅图清晰地描述了 SecurityContextHolder、SecurityContext 以及 Authentication 三者之间 的关系。
首先在 SecurityContextHolder 中存放的是 SecurityContext, SecurityContextHolder 中定义了三种不同的数据存储策略,这实际上是一种典型的策略模式:
- MODE_THREADLOCAL: 这种存放策略是将 SecurityContext 存放在 ThreadLocal 中,大家知道ThreadLocal的特点是在哪个线程中存储就要在哪个线程中读取,这其实非常适合Web应用,因为在默认情况下,一个请求无论经过多少Filter到达Servlet都是由一个线程来处理的,这也是SecurityContextHolder的默认存储策略,这种存储策略意味着如果在具体的业务处理代码中,开启了子线程,在子线程中去获取登录用户数据,就会获取不到。
- MODE_INHERITABLETHREADLOCAL:这种存储模式适用于多线程环境,如果希望在子线程中也能够获取到登录用户数据,那么可以使用这种存储模式。
- MODE_GLOBAL:这种存储模式实际上是将数据保存在一个静态变量中,在Java Web开发中,这种模式很少使用到。
Spring Security中定义了 SecurityContextHolderStrategy接口用来规范存储策略中的方法, 我们来看一下:
public interface SecurityContextHolderStrategy {
	void clearContext();
	SecurityContext getContext();
	void setContext(SecurityContext context);
	SecurityContext createEmptyContext();
}
接口中一共定义了四个方法:
- clearContext:该方法用来清除存储的SecurityContext对象。
- getContext:该方法用来获取存储的SecurityContext对象。
- setContext:该方法用来设置存储的SecurityContext对象。
- createEmptyContext: 该方法则用来创建一个空的 SecurityContext对象。
在 Spring Security 中,SecurityContextHolderStrategy接口一共有三个实现类,对应了三种不同的存储策略,如图2-14所示

图 2-14
每一个实现类都对应了不同的实现策略,我们先来看一下ThreadLocalSecurityContextHolderStrategy:
final class ThreadLocalSecurityContextHolderStrategy implements
		SecurityContextHolderStrategy {
	private static final ThreadLocal<SecurityContext> contextHolder = new ThreadLocal<>();
	public void clearContext() {
		contextHolder.remove();
	}
	public SecurityContext getContext() {
		SecurityContext ctx = contextHolder.get();
		if (ctx == null) {
			ctx = createEmptyContext();
			contextHolder.set(ctx);
		}
		return ctx;
	}
	public void setContext(SecurityContext context) {
		Assert.notNull(context, "Only non-null SecurityContext instances are permitted");
		contextHolder.set(context);
	}
	public SecurityContext createEmptyContext() {
		return new SecurityContextImpl();
	}
}ThreadLocalSecurityContextHolderStrategy实现了 SecurityContextHolderStrategy接口,并实现了接口中的方法,存储数据的载体就是一个ThreadLocal,所以针对SecurityContext的清空、获取以及存储,都是在ThreadLocal中进行操作,例如清空就是调用ThreadLocal的remove 方法。SecurityContext是一个接口,它只有一个实现类SecurityContextImpl,所以创建就直接新建一个SecurityContextImpl对象即可。
再来看 InheritableThreadLocalSecurityContextHolderStrategy:
final class InheritableThreadLocalSecurityContextHolderStrategy implements
		SecurityContextHolderStrategy {
	private static final ThreadLocal<SecurityContext> contextHolder = new InheritableThreadLocal<>();
	public void clearContext() {
		contextHolder.remove();
	}
	public SecurityContext getContext() {
		SecurityContext ctx = contextHolder.get();
		if (ctx == null) {
			ctx = createEmptyContext();
			contextHolder.set(ctx);
		}
		return ctx;
	}
	public void setContext(SecurityContext context) {
		Assert.notNull(context, "Only non-null SecurityContext instances are permitted");
		contextHolder.set(context);
	}
	public SecurityContext createEmptyContext() {
		return new SecurityContextImpl();
	}
}
InheritableThreadLocalSecurityContextHolderStrategy 和 ThreadLocalSecurityContextHolderStrategy的实现策略基本一致,不同的是存储数据的载体变了,在InheritableThreadLocalSecurityContextHolderStrategy 中存储数据的载体变成了 InheritableThreadLocal。InheritableThreadLocal继承自ThreadLocaL但是多了一个特性,就是在子线程创建的一瞬间,会自动将父线程中的数据复制到子线程中。该存储策略正是利用了这一特性,实现了在子线程中获取登录用户信息的功能,
最后再来看一下 GlobalSecurityContextHolderStrategy:
final class GlobalSecurityContextHolderStrategy implements SecurityContextHolderStrategy {
	private static SecurityContext contextHolder;
	public void clearContext() {
		contextHolder = null;
	}
	public SecurityContext getContext() {
		if (contextHolder == null) {
			contextHolder = new SecurityContextImpl();
		}
		return contextHolder;
	}
	public void setContext(SecurityContext context) {
		Assert.notNull(context, "Only non-null SecurityContext instances are permitted");
		contextHolder = context;
	}
	public SecurityContext createEmptyContext() {
		return new SecurityContextImpl();
	}
}GlobalSecurityContextHolderStrategy的实现就更简单了,用一个静态变量来保存 SecurityContext,所以它也可以在多线程环境下使用,但是一般在Web开发中,这种存储策略使用得较少。
查看代码
 public class SecurityContextHolder {
	public static final String MODE_THREADLOCAL = "MODE_THREADLOCAL";
	public static final String MODE_INHERITABLETHREADLOCAL = "MODE_INHERITABLETHREADLOCAL";
	public static final String MODE_GLOBAL = "MODE_GLOBAL";
	public static final String SYSTEM_PROPERTY = "spring.security.strategy";
	private static String strategyName = System.getProperty(SYSTEM_PROPERTY);
	private static SecurityContextHolderStrategy strategy;
	private static int initializeCount = 0;
	static {
		initialize();
	}
	public static void clearContext() {
		strategy.clearContext();
	}
	public static SecurityContext getContext() {
		return strategy.getContext();
	}
	public static int getInitializeCount() {
		return initializeCount;
	}
	private static void initialize() {
		if (!StringUtils.hasText(strategyName)) {
			strategyName = MODE_THREADLOCAL;
		}
		if (strategyName.equals(MODE_THREADLOCAL)) {
			strategy = new ThreadLocalSecurityContextHolderStrategy();
		}
		else if (strategyName.equals(MODE_INHERITABLETHREADLOCAL)) {
			strategy = new InheritableThreadLocalSecurityContextHolderStrategy();
		}
		else if (strategyName.equals(MODE_GLOBAL)) {
			strategy = new GlobalSecurityContextHolderStrategy();
		}
		else {
			try {
				Class<?> clazz = Class.forName(strategyName);
				Constructor<?> customStrategy = clazz.getConstructor();
				strategy = (SecurityContextHolderStrategy) customStrategy.newInstance();
			}
			catch (Exception ex) {
				ReflectionUtils.handleReflectionException(ex);
			}
		}
		initializeCount++;
	}
	public static void setContext(SecurityContext context) {
		strategy.setContext(context);
	}
	public static void setStrategyName(String strategyName) {
		SecurityContextHolder.strategyName = strategyName;
		initialize();
	}
	public static SecurityContextHolderStrategy getContextHolderStrategy() {
		return strategy;
	}
	public static SecurityContext createEmptyContext() {
		return strategy.createEmptyContext();
	}
	@Override
	public String toString() {
		return "SecurityContextHolder[strategy='" + strategyName + "'; initializeCount="
				+ initializeCount + "]";
	}
}
这段源码中可以看到,SecurityContextHolder定义了三个静态常量用来描述三种不同的存储策略;存储策略strategy会在静态代码块中进行初始化,根据不同的strategyName初始化不同的存储策略;strategyName变量表示目前正在使用的存储策略,开发者可以通过配置系统变量或者调用setStrategyName来修改SecurityContextHolder中的存储策略,调用 setStrategyName 后会重新初始化 strategy。
默认情况下,如果开发者试图从子线程中获取当前登录用户数据,就会获取失败,代码如下:
package com.intehel.demo.controller;

import org.springframework.security.core.Authentication;
import org.springframework.security.core.GrantedAuthority;
import org.springframework.security.core.context.SecurityContextHolder;
import org.springframework.web.bind.annotation.GetMapping;
import org.springframework.web.bind.annotation.RestController;
import java.util.Collection;

@RestController
public class UserController {
    @GetMapping("/user")
    public void userinfo(){
        Authentication authentication = SecurityContextHolder.getContext().getAuthentication();
        String name = authentication.getName();
        Collection<? extends GrantedAuthority> authorities = authentication.getAuthorities();
        System.out.println("name = "+name);
        System.out.println("authorities = "+authorities);
        new Thread(new Runnable() {
            @Override
            public void run() {
                Authentication authentication = SecurityContextHolder.getContext().getAuthentication();
                if (authentication == null) {
                    System.out.println("获取用户信息失败");
                }
                String name = authentication.getName();
                Collection<? extends GrantedAuthority> authorities = authentication.getAuthorities();
                String threadName = Thread.currentThread().getName();
                System.out.println(threadName+":name = "+name);
                System.out.println(threadName+":authorities = " + authorities);
            }
        }).start();
    }
}
在子线程中尝试获取登录用户数据时,获取到的数据为null,如图2-15所示。

图 2-15
子线程之所以获取不到登录用户信息,就是因为数据存储在ThreadLocal中,存储和读取不是同一个线程,所以获取不到。如果希望子线程中也能够获取到登录用户信息,可以将 SecurityContextHolder 中的存储策略改为 MODE INHERITABLETHREADLOCAL,这样就支持多线程环境下获取登录用户信息了。
默认的存储策略是通过System.getProperty加载的,因此我们可以通过配置系统变量来修改默认的存储策略,以IntelliJ IDEA为例,首先单击启动按钮,选择Edit Configurations按钮, 如图2-16所示,然后在打开的选项中,配置VM options参数,添加如下一行,配置界面如图 2-17所示
-Dspring.security.strategy=MODE_INHERITABLETHREADLOCAL
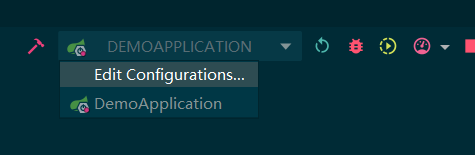
图 2-16
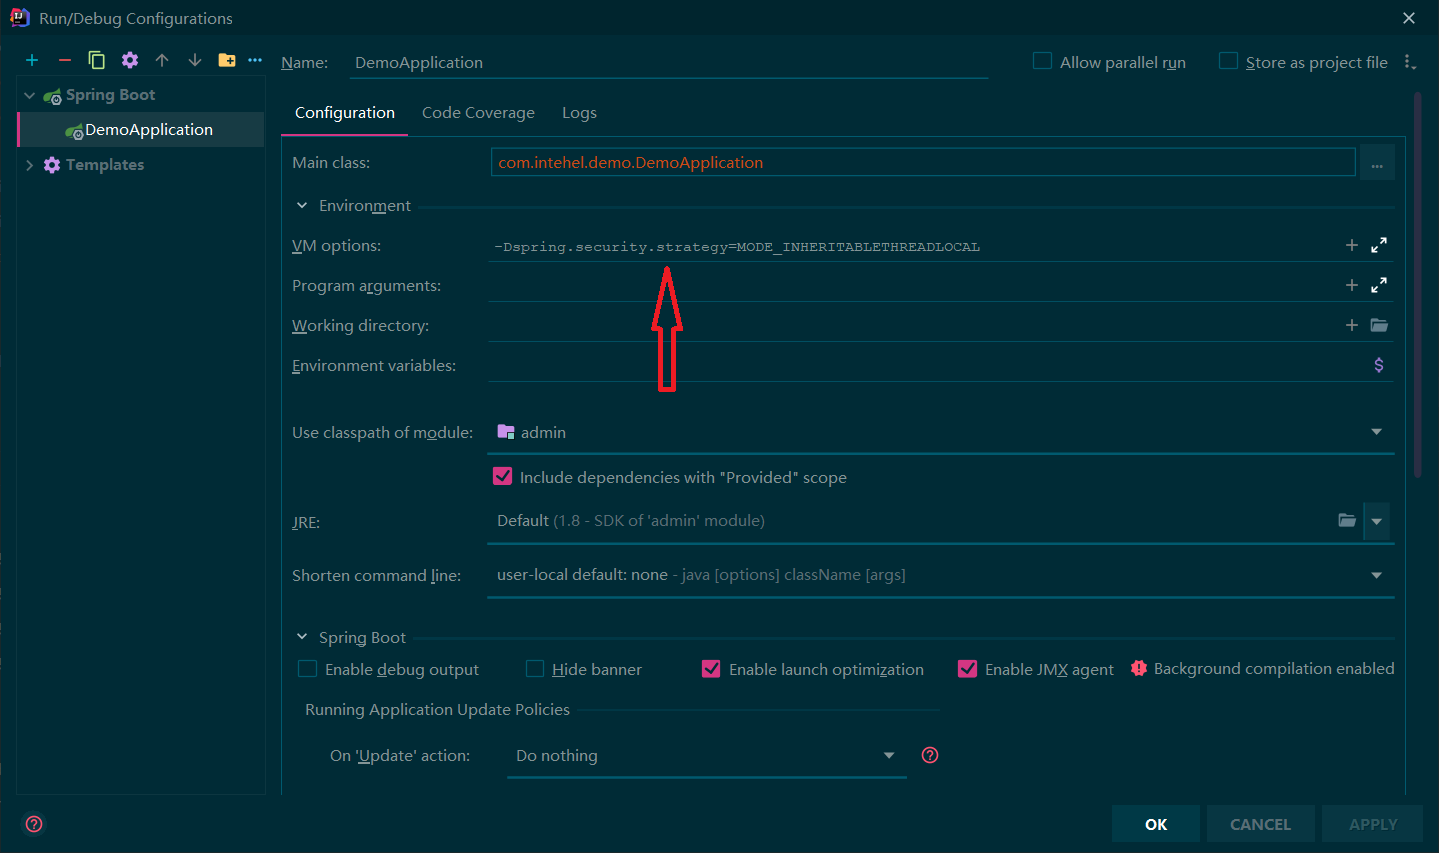
图 2-17
这样,在SecurityContextHolder中通过System.getProperty加载到的默认存储策略就支持多线程环境了,
配置完成之后,再次启动项目,此时访问/user接口,即使在子线程中,也可以获取到登录用户信息了,如图2-18所示。

图 2-18
那么既然SecurityContextHolder默认是将用户信息存储在 ThreadLocal中,在Spring Boot中不同的请求都是由不同的线程处理的,那为什么每一次请求都还能从SecurityContextHolder中获取到登录用户信息呢?这就不得不提到Spring Security过滤器链中重要—环 SecurityContextPersistenceFliter。
1.1.2 SecurityContextPersistenceFilter
前面介绍了 Spring Security中的常见过滤器,在这些过滤器中,存在一个非常重要的过滤器就是 SecurityContextPersistenceFliter。
默认情况下,在 Spring Security 过滤器链中,SecurityContextPersistenceFilter 是第一道防线,位于 WebAsyncManagerlntegrationFilter 之后。从 SecurityContextPersistenceFilter 这个过滤器的名字上就可以推断出来,它的作用是为了存储SecuntyContext而设计的。
整体上来说,SecurityContextPersistenceFilter 主要做两件事情:
- 当一个请求到来时,从 HttpSession 中获取 SecurityContext 并存入 SecurityContextHolder中,这样在同一个请求的后续处理过程中,开发者始终可以通过SeciuityContextHolder 获取到当前登录用户信息,
- 当一个请求处理完毕时,从SecurityContextHolder中获取SecuntyContext并存入 HttpSession中(主要针对异步Servlet),方便下一个请求到来时,再从HttpSession中拿出来使用,同时擦除SecurityContextHolder中的登录用户信息。
在SecurityContextPersistenceFilter 过滤器中,当一个请求处理完毕时,从SecurityContextHolder中获取SecurityContext 存入 HttpSession 中,这一步的操作主要是针对异步Servlet。如果不是异步Servlet,在响应提交时,就会将
SecurityContext 保存到HttpSession 中了,而不会等到在SecurityContextPersistenceFliter过滤器中再去存储。
这就是SecurityContextPersistenceFliter大致上做的事情,在正式升始介绍SecurityContextPersistenceFilter 之前,需要先介绍另外接口,这就是 SecurityContextRepository接口,将 SecurityContext 存入 HttpSession,或者从 HttpSession 中加载数据并转为 SecurityContext对象,这些事情都是由SecurityContextRepositoiy接口的实现类完成的,因此这里我们 就先从 SecurityContextRepository 接口开始看起。首先我们来看一下SecurityContextRepository接口的定义:
public interface SecurityContextRepository {
	SecurityContext loadContext(HttpRequestResponseHolder requestResponseHolder);
	void saveContext(SecurityContext context, HttpServletRequest request,
			HttpServletResponse response);
	boolean containsContext(HttpServletRequest request);
}
SecurityContextRepository接口 中一共定义了三个方法:
- loadContext:这个方法用来加载SecurityContext 对象出来,对于没有登录的用户,这里会返回一个空的SecurityContext对象,注意空的SecurityContext对象是指SecurityContext 中不存在Authentication对象,而不是该方法返回null。
- saveContext:该方法用来保存一个 SecurityContext 对象
- containsContext:该方法可以判断SecurityContext对象是否存在。
在Spring Security框架中,为SecurityContextRepository接口一共提供了三个实现类,如图2-19所示。

图 2-19
在这三个实现类中,TestSecurityContextRepository为单元测试提供支持;NullSecurityContextRepository 实现类中,loadContext 方法总是返回一个空的 SecurityContext 对象, saveContext方法未做任何实现,containsContext方法总是返回false ,所以 NullSecurityContextRepository 实现类实际上未做 SecurityContext 的存储工作,
在 Spring Security 中默认使用的实现类是 HttpSessionSecurityContextRepository,通过 HttpSessionSecurityContextRepository实现了将 SecurityContext 存储到 HttpSession 以及从 HttpSession 中加载 SecurityContext出来,这里我们来重点看一下 HttpSessionSecurityContextRepository 类。
在正式开始介绍 HttpSessionSecurityContextRepository之前,首先来看一下 HttpSessionSecurityContextRepository中定义的关于请求和封装的两个内部类。
首先是 HttpSessionSecurityContextRepository中定义的对于响应的封装类 SaveToSessionResponseWrapper,我们先来看一下 SaveToSessionResponseWrapper的继承关系图,如图 2-20 所示。

图 2-20
从这幅继承关系图中可以看到,SaveToSessionResponseWrapper实际上就是我们所熟知的 HttpServletResponse功能的扩展。这里有三个关键的实现类:
- HttpServletResponseWrapper: HttpServletResponseWrapper 实现了HttpServletResponse 接口,它是HttpServletResponse的装饰类,利用HttpServletResponseWrapper可以方便地操作参数和输出流等。
- OnCommittedResponseWrapper: OnCommittedResponseWrapper继承自HttpServletResponseWrapper对其功能进行了增强,最重要的增强在于可以获取HttpServletResponse的提交行为。当HttpServletResponse的 sendRedirect.flushBuffer.flush 以及 close 等方法被调用时,onResponseCommitted方法会被触发,开发者可以在onResponseCommitted方法中做一些数据保存操作,例如保存SecurityContext 不过OnCommittedResponseWrapper中的onResponseCommitted方法只是一个抽象方法,并没有具体的实现,具体的实现则在它的实现类 SaveContextOnUpdateOrErrorResponseWrapper中心
- SaveContextOnUpdateOrErrorResponseWrapper:该类继承自OnCommittedResponseWrapper并对 onResponseCommitted方法做了实现由在SaveContextOnUpdateOrErrorResponseWrapper类中声明了一个contextSaved变量,表示SecurityContext是否已经存储成功,当HttpServletResponse 提交时,会调用 onResponseCommitted 方法,任 onResponseCommitted方法中调用 saveContext 方法,将 SecurityContext保存到 HttpSession 中,同时将 contextSaved 变量标记为true。 saveContext方法在这里也是一个抽象方法,具体的实现则在SaveToSessionResponseWrapper 类中。
接下来看一下 HttpSessionSecurityContextRepositoiy 中 SaveToSessionResponseWrapper 的定义:
查看代码
 final class SaveToSessionResponseWrapper extends
			SaveContextOnUpdateOrErrorResponseWrapper {
		private final HttpServletRequest request;
		private final boolean httpSessionExistedAtStartOfRequest;
		private final SecurityContext contextBeforeExecution;
		private final Authentication authBeforeExecution;
		SaveToSessionResponseWrapper(HttpServletResponse response,
				HttpServletRequest request, boolean httpSessionExistedAtStartOfRequest,
				SecurityContext context) {
			super(response, disableUrlRewriting);
			this.request = request;
			this.httpSessionExistedAtStartOfRequest = httpSessionExistedAtStartOfRequest;
			this.contextBeforeExecution = context;
			this.authBeforeExecution = context.getAuthentication();
		}
		@Override
		protected void saveContext(SecurityContext context) {
			final Authentication authentication = context.getAuthentication();
			HttpSession httpSession = request.getSession(false);
			if (authentication == null || trustResolver.isAnonymous(authentication)) {
				if (logger.isDebugEnabled()) {
					logger.debug("SecurityContext is empty or contents are anonymous - context will not be stored in HttpSession.");
				}
				if (httpSession != null && authBeforeExecution != null) {
					httpSession.removeAttribute(springSecurityContextKey);
				}
				return;
			}
			if (httpSession == null) {
				httpSession = createNewSessionIfAllowed(context);
			}
			if (httpSession != null) {
				if (contextChanged(context)
						|| httpSession.getAttribute(springSecurityContextKey) == null) {
					httpSession.setAttribute(springSecurityContextKey, context);

					if (logger.isDebugEnabled()) {
						logger.debug("SecurityContext '" + context
								+ "' stored to HttpSession: '" + httpSession);
					}
				}
			}
		}
		private boolean contextChanged(SecurityContext context) {
			return context != contextBeforeExecution
					|| context.getAuthentication() != authBeforeExecution;
		}
		private HttpSession createNewSessionIfAllowed(SecurityContext context) {
			if (httpSessionExistedAtStartOfRequest) {
				if (logger.isDebugEnabled()) {
					logger.debug("HttpSession is now null, but was not null at start of request; "
							+ "session was invalidated, so do not create a new session");
				}
				return null;
			}
			if (!allowSessionCreation) {
				if (logger.isDebugEnabled()) {
					logger.debug("The HttpSession is currently null, and the "
							+ HttpSessionSecurityContextRepository.class.getSimpleName()
							+ " is prohibited from creating an HttpSession "
							+ "(because the allowSessionCreation property is false) - SecurityContext thus not "
							+ "stored for next request");
				}

				return null;
			}
			if (contextObject.equals(context)) {
				if (logger.isDebugEnabled()) {
					logger.debug("HttpSession is null, but SecurityContext has not changed from default empty context: ' "
							+ context
							+ "'; not creating HttpSession or storing SecurityContext");
				}
				return null;
			}
			if (logger.isDebugEnabled()) {
				logger.debug("HttpSession being created as SecurityContext is non-default");
			}
			try {
				return request.getSession(true);
			}
			catch (IllegalStateException e) {
				logger.warn("Failed to create a session, as response has been committed. Unable to store"
						+ " SecurityContext.");
			}
			return null;
		}
	}
在 SaveToSessionResponseWrapper 中其实主要定义了三个方法:saveContext、contextChanged以及CreateNewSessionIfAllowed
- saveContext:该方法主要是用来保存 SecurityContext,如果 authentication 对象为 null 或者它是一个匿名对象,则不需要保存SecurityContext (参见SEC-776: https://github.com/ spring-projects/spring-security/issues/1036);同时,如果 httpSession 不为 null 并且 authBeforeExecution也不为null,就从httpSession中将保存的登录用户数据移除,这个主要是为了防止 开发者在注销成功的回调中继续调用doFilter方法,进而导致原始的登录信息无法清除的问题(参见 SEC-1587: https://github.com/spting-projects/spTing-secuTity/issues/1826);如果 httpSession为null,则去创建一个HttpSession对象;最后,如果SecurityContext发生了变化, 或者httpSession中没有保存 SecurityContext,则调用 httpSession 中的 setAttribute 方法将 SecurityContext保存起来。
- contextChanged:该方法主要用来判断SecurityContext是否发生变化,因为在程序运行过程中,开者可能修改了 SecurityContext中的Authentication对象。
- createNewSessionlfAllowed: 该方法用来创建一个 HttpSession 对象。
这就是 HttpSessionSecurityContextRepositoiy 中封装的 SaveToSessionResponseWrapper 对象,一个核心功能就是在HttpServletResponse提交的时候,将SecurityContext保存到HttpSession 中,
接下来看—下 HttpSessionSecurityContextRepositoiy 中关于 SaveToSessionResponseWrapper 的定义,SaveToSessionResponseWrapper相对而言就要简单很多了:
	private static class Servlet3SaveToSessionRequestWrapper extends
			HttpServletRequestWrapper {
		private final SaveContextOnUpdateOrErrorResponseWrapper response;
		public Servlet3SaveToSessionRequestWrapper(HttpServletRequest request,
				SaveContextOnUpdateOrErrorResponseWrapper response) {
			super(request);
			this.response = response;
		}
		@Override
		public AsyncContext startAsync() {
			response.disableSaveOnResponseCommitted();
			return super.startAsync();
		}
		@Override
		public AsyncContext startAsync(ServletRequest servletRequest,
				ServletResponse servletResponse) throws IllegalStateException {
			response.disableSaveOnResponseCommitted();
			return super.startAsync(servletRequest, servletResponse);
		}
}SaveToSessionRequestWrapper类实际上是在Spring Security 3.2之后出现的封装类,在 Spring Security 3.2 之前并不存在 SaveToSessionRequestWrapper 类。封装的 SaveToSessionRequestwrapper类主要作用是禁止在异步Servlet提交时,自动保存SecurityContext
为什么要禁止呢?我们来看如下一段简单的代码:
@GetMapping("/user2")
public void userinfo(HttpServletRequest req, HttpServletResponse resp){
    AsyncContext asyncContext = req.startAsync();
    CompletableFuture.runAsync(()->{
        try {
            PrintWriter out = asyncContext.getResponse().getWriter();
            out.write("hello buretuzi");
            asyncContext.complete();
        }catch (IOException e){
            e.printStackTrace();
        }
    });
}
可以看到,在异步Servlet中,当任务执行完毕之后,HttpServletResponse也会自动提交, 在提交的过程中会自动保存SecurityContext到HttpSession中,但是由于是在子线程中,因此无法获取到 SecurityContext 对象(SecurityContextHolder 默认将数据存储在 ThreadLocal 中), 所以会保存失败。如果开发者使用了异步Servlet,则默认情况下会禁用HttpServletResponse 提交时自动保存SecurityContext这一功能,改为在SecurityContextPersistenceFilter过滤器中完成 SecurityContext 保存操作。
看完了 HttpSessionSecurityContextRepositoiy中封装的两个请求/响应对象之后,接下来我 们再来整体上看一下 HttpSessionSecurityContextRepositoiy 类的功能
查看代码
 public class HttpSessionSecurityContextRepository implements SecurityContextRepository {
	public static final String SPRING_SECURITY_CONTEXT_KEY = "SPRING_SECURITY_CONTEXT";
	protected final Log logger = LogFactory.getLog(this.getClass());
	private final Object contextObject = SecurityContextHolder.createEmptyContext();
	private boolean allowSessionCreation = true;
	private boolean disableUrlRewriting = false;
	private boolean isServlet3 = ClassUtils.hasMethod(ServletRequest.class, "startAsync");
	private String springSecurityContextKey = SPRING_SECURITY_CONTEXT_KEY;
	private AuthenticationTrustResolver trustResolver = new AuthenticationTrustResolverImpl();
	public SecurityContext loadContext(HttpRequestResponseHolder requestResponseHolder) {
		HttpServletRequest request = requestResponseHolder.getRequest();
		HttpServletResponse response = requestResponseHolder.getResponse();
		HttpSession httpSession = request.getSession(false);
		SecurityContext context = readSecurityContextFromSession(httpSession);
		if (context == null) {
			if (logger.isDebugEnabled()) {
				logger.debug("No SecurityContext was available from the HttpSession: "
						+ httpSession + ". " + "A new one will be created.");
			}
			context = generateNewContext();
		}
		SaveToSessionResponseWrapper wrappedResponse = new SaveToSessionResponseWrapper(
				response, request, httpSession != null, context);
		requestResponseHolder.setResponse(wrappedResponse);
		if (isServlet3) {
			requestResponseHolder.setRequest(new Servlet3SaveToSessionRequestWrapper(
					request, wrappedResponse));
		}
		return context;
	}
	public void saveContext(SecurityContext context, HttpServletRequest request,
			HttpServletResponse response) {
		SaveContextOnUpdateOrErrorResponseWrapper responseWrapper = WebUtils
				.getNativeResponse(response,
						SaveContextOnUpdateOrErrorResponseWrapper.class);
		if (responseWrapper == null) {
			throw new IllegalStateException(
					"Cannot invoke saveContext on response "
							+ response
							+ ". You must use the HttpRequestResponseHolder.response after invoking loadContext");
		}
		if (!responseWrapper.isContextSaved()) {
			responseWrapper.saveContext(context);
		}
	}
	public boolean containsContext(HttpServletRequest request) {
		HttpSession session = request.getSession(false);
		if (session == null) {
			return false;
		}
		return session.getAttribute(springSecurityContextKey) != null;
	}
	private SecurityContext readSecurityContextFromSession(HttpSession httpSession) {
		final boolean debug = logger.isDebugEnabled();

		if (httpSession == null) {
			if (debug) {
				logger.debug("No HttpSession currently exists");
			}
			return null;
		}
		Object contextFromSession = httpSession.getAttribute(springSecurityContextKey);
		if (contextFromSession == null) {
			if (debug) {
				logger.debug("HttpSession returned null object for SPRING_SECURITY_CONTEXT");
			}
			return null;
		}
		if (!(contextFromSession instanceof SecurityContext)) {
			if (logger.isWarnEnabled()) {
				logger.warn(springSecurityContextKey
						+ " did not contain a SecurityContext but contained: '"
						+ contextFromSession
						+ "'; are you improperly modifying the HttpSession directly "
						+ "(you should always use SecurityContextHolder) or using the HttpSession attribute "
						+ "reserved for this class?");
			}
			return null;
		}
		if (debug) {
			logger.debug("Obtained a valid SecurityContext from "
					+ springSecurityContextKey + ": '" + contextFromSession + "'");
		}
		return (SecurityContext) contextFromSession;
	}
	protected SecurityContext generateNewContext() {
		return SecurityContextHolder.createEmptyContext();
	}
	public void setAllowSessionCreation(boolean allowSessionCreation) {
		this.allowSessionCreation = allowSessionCreation;
	}
	public void setDisableUrlRewriting(boolean disableUrlRewriting) {
		this.disableUrlRewriting = disableUrlRewriting;
	}
	public void setSpringSecurityContextKey(String springSecurityContextKey) {
		Assert.hasText(springSecurityContextKey,
				"springSecurityContextKey cannot be empty");
		this.springSecurityContextKey = springSecurityContextKey;
	}
	private static class Servlet3SaveToSessionRequestWrapper extends
			HttpServletRequestWrapper {
		private final SaveContextOnUpdateOrErrorResponseWrapper response;
		public Servlet3SaveToSessionRequestWrapper(HttpServletRequest request,
				SaveContextOnUpdateOrErrorResponseWrapper response) {
			super(request);
			this.response = response;
		}
		@Override
		public AsyncContext startAsync() {
			response.disableSaveOnResponseCommitted();
			return super.startAsync();
		}
		@Override
		public AsyncContext startAsync(ServletRequest servletRequest,
				ServletResponse servletResponse) throws IllegalStateException {
			response.disableSaveOnResponseCommitted();
			return super.startAsync(servletRequest, servletResponse);
		}
	}
	final class SaveToSessionResponseWrapper extends
			SaveContextOnUpdateOrErrorResponseWrapper {
		private final HttpServletRequest request;
		private final boolean httpSessionExistedAtStartOfRequest;
		private final SecurityContext contextBeforeExecution;
		private final Authentication authBeforeExecution;
		SaveToSessionResponseWrapper(HttpServletResponse response,
				HttpServletRequest request, boolean httpSessionExistedAtStartOfRequest,
				SecurityContext context) {
			super(response, disableUrlRewriting);
			this.request = request;
			this.httpSessionExistedAtStartOfRequest = httpSessionExistedAtStartOfRequest;
			this.contextBeforeExecution = context;
			this.authBeforeExecution = context.getAuthentication();
		}
		@Override
		protected void saveContext(SecurityContext context) {
			final Authentication authentication = context.getAuthentication();
			HttpSession httpSession = request.getSession(false);
			if (authentication == null || trustResolver.isAnonymous(authentication)) {
				if (logger.isDebugEnabled()) {
					logger.debug("SecurityContext is empty or contents are anonymous - context will not be stored in HttpSession.");
				}
				if (httpSession != null && authBeforeExecution != null) {
					httpSession.removeAttribute(springSecurityContextKey);
				}
				return;
			}
			if (httpSession == null) {
				httpSession = createNewSessionIfAllowed(context);
			}
			if (httpSession != null) {
				if (contextChanged(context)
						|| httpSession.getAttribute(springSecurityContextKey) == null) {
					httpSession.setAttribute(springSecurityContextKey, context);

					if (logger.isDebugEnabled()) {
						logger.debug("SecurityContext '" + context
								+ "' stored to HttpSession: '" + httpSession);
					}
				}
			}
		}
		private boolean contextChanged(SecurityContext context) {
			return context != contextBeforeExecution
					|| context.getAuthentication() != authBeforeExecution;
		}
		private HttpSession createNewSessionIfAllowed(SecurityContext context) {
			if (httpSessionExistedAtStartOfRequest) {
				if (logger.isDebugEnabled()) {
					logger.debug("HttpSession is now null, but was not null at start of request; "
							+ "session was invalidated, so do not create a new session");
				}
				return null;
			}
			if (!allowSessionCreation) {
				if (logger.isDebugEnabled()) {
					logger.debug("The HttpSession is currently null, and the "
							+ HttpSessionSecurityContextRepository.class.getSimpleName()
							+ " is prohibited from creating an HttpSession "
							+ "(because the allowSessionCreation property is false) - SecurityContext thus not "
							+ "stored for next request");
				}
				return null;
			}
			if (contextObject.equals(context)) {
				if (logger.isDebugEnabled()) {
					logger.debug("HttpSession is null, but SecurityContext has not changed from default empty context: ' "
							+ context
							+ "'; not creating HttpSession or storing SecurityContext");
				}
				return null;
			}
			if (logger.isDebugEnabled()) {
				logger.debug("HttpSession being created as SecurityContext is non-default");
			}
			try {
				return request.getSession(true);
			}
			catch (IllegalStateException e) {
				logger.warn("Failed to create a session, as response has been committed. Unable to store"
						+ " SecurityContext.");
			}
			return null;
		}
	}
	public void setTrustResolver(AuthenticationTrustResolver trustResolver) {
		Assert.notNull(trustResolver, "trustResolver cannot be null");
		this.trustResolver = trustResolver;
	}
}- 首先通过 SPRING_SECURITY_CONTEXT_KEY 变量定义了 SecurityContext 在 HttpSession中存储的key,如果开发者需要手动操作HttpSession中存储的SecurityContext,可以通过该key来操作。
- trustResolver是一个用户身份评估器,用来判断当前用户是匿名用户还是通过 RememberMe登录的用户。
- 在 loadContext 方法中,通过调用 readSecurityContextFromSession 方法来获取 SecurityContext对象,如果获取到的对象为null,则调用generateNewContext方法去生成一个空的SecurityContext对象,最后构造请求和响应的装饰类并存入requestResponseHolder对象中。
- saveContext方法用来保存SecurityContext,在保存之前,会先调用isContextSaved 方法判断是否已经保存了,如果已经保存了,则不再保存,正常情况下,在HttpServletResponse 提交时SecurityContext就已经保存到HttpSession中;如果是异步Servlet,则提交时不会自动将SecurityContext保存到HttpSession,此时会在这里进行保存操作。
- containsContext方法用来判断请求中是否存在SecurityContext对象。
- readSecurityContextFromSession 方法执行具体的 SecurityContext 读取逻辑,从 HttpSession 中获取 SecurityContext 并返回。
- generateNewContext 方法用来生成一个不包含 Authentication 的空的 SecurityContext 对象。
- setAllowSessionCreation方法用来设置是否允许创建HttpSession,默认是true。
- setDisableUrlRewriting方法表示是否禁用URL重写,默认是false。
- setSpringSecurityContextKey 方法可以用来配置 HttpSession 中存储 SecurityContext 的 key。
- isTransientAuthentication 方法用来判断 Authentication 是否免于存储。
- setTrustResolver方法用来配置身份评估器。
这就是HttpSessionSecurityContextRepositoiy所提供的所有功能,这些功能都将在 SecurityContextPersistenceFilter过滤器中进行调用,那么接下来我们就来看一下SecurityContextPersistenceFilter中的调用逻辑:
public class SecurityContextPersistenceFilter extends GenericFilterBean {
	static final String FILTER_APPLIED = "__spring_security_scpf_applied";
	private SecurityContextRepository repo;
	private boolean forceEagerSessionCreation = false;
	public SecurityContextPersistenceFilter() {
		this(new HttpSessionSecurityContextRepository());
	}
	public SecurityContextPersistenceFilter(SecurityContextRepository repo) {
		this.repo = repo;
	}
	public void doFilter(ServletRequest req, ServletResponse res, FilterChain chain)
			throws IOException, ServletException {
		HttpServletRequest request = (HttpServletRequest) req;
		HttpServletResponse response = (HttpServletResponse) res;
		if (request.getAttribute(FILTER_APPLIED) != null) {
			chain.doFilter(request, response);
			return;
		}
		final boolean debug = logger.isDebugEnabled();
		request.setAttribute(FILTER_APPLIED, Boolean.TRUE);
		if (forceEagerSessionCreation) {
			HttpSession session = request.getSession();
			if (debug && session.isNew()) {
				logger.debug("Eagerly created session: " + session.getId());
			}
		}
		HttpRequestResponseHolder holder = new HttpRequestResponseHolder(request,
				response);
		SecurityContext contextBeforeChainExecution = repo.loadContext(holder);
		try {
			SecurityContextHolder.setContext(contextBeforeChainExecution);
			chain.doFilter(holder.getRequest(), holder.getResponse());
		}
		finally {
			SecurityContext contextAfterChainExecution = SecurityContextHolder
					.getContext();
			SecurityContextHolder.clearContext();
			repo.saveContext(contextAfterChainExecution, holder.getRequest(),
					holder.getResponse());
			request.removeAttribute(FILTER_APPLIED);
			if (debug) {
				logger.debug("SecurityContextHolder now cleared, as request processing completed");
			}
		}
	}
	public void setForceEagerSessionCreation(boolean forceEagerSessionCreation) {
		this.forceEagerSessionCreation = forceEagerSessionCreation;
	}
}
过滤器的核心方法当然是doFilter,我们就从doFilter方法开始介绍:
- 首先从request中获取FILTER_APPLIED属性,如果该属性值不为null则直接执行doFilter方法,当前过滤器到此为止,这个判断主要是确保该请求只执行一次该过滤 器,如果确实是该request第一次经过该过滤器,则给其设置上FILTER_APPLIED属性。
- forceEagerSessionCreation变量表示是否要在过滤器链执行之前确保会话有效,由于这是一个比较耗费资源的操作,因此默认为false,
- 构造 HttpRequestResponseHolder 对象,将 HttpServletRequest 和 HttpServletResponse 都存储进去。
- 调用loadContext方法去加载SecurityContext, repo实际上就是我们前面所说 HttpSessionSecurityContextRepository 的实例,所以 loadContext 方法这里就不再赘述了。
- 将读取到的SecurityContext存入SecurityContextHolder之中,这样,在接下来的处理逻辑中,开发者就可以直接通过SecurityContextHolder获取当前登录用户对象了。
- 调用doFilter方法使请求继续向下走,但是要注意,此时传递的request和 response 对象是在 HttpSessionSecurityContextRepositoiy 中封装后的对象,即 SaveToSessionResponseWrapper 和 SaveToSessionRequestWrapper 的实例。
- 当请求处理完毕后,在finally模块中,获取最新的SecurityContext对象(开发者可能在后续处理中修改了SecurityContext中的Authentication对象),然后清空SecurityContextHolder中的数据;再调用saveContext方法保存SecurityContext,具体的保存逻辑前面已经说过,这里就不再赘述了。
- 最后,从 request 中移除 FILTER_APPLIED 属性。
这就是整个SecurityContextPersistenceFilter过滤器的工作逻辑。一言以蔽之,请求在到达 SecurityContextPersistenceFilter 过滤器之后,先从 HttpSession 中读取 SecurityContext 出来,并存入SecurityContextHolder之中以备后续使用;当请求离开 SecurityContextPersisteiiceFilter过滤器的时候,获取最新的SecurityContext并存入HttpSession中,同时清空SecurityContextHolder中的登录用户信息。
这就是第一种登录数据的获取方式,即从SecurityContextHolder中获取。
1.2 从当前请求对象中获取
接下来我们来看一下第二种登录数据获取方式——从当前请求中获取。获取代码如下:
@RequestMapping("/authentication")
public void authentication(Authentication authentication){
    System.out.println("Authentication = "  + authentication);
}
@RequestMapping("/principal")
public void principal(Principal principal){
    System.out.println("Principal = " + principal);
}
开发者可以直接在Controller的请求参数中放入Authentication对象来获取登录用户信息。 通过前面的讲解,大家已经知道Authentication是Principal的子类,所以也可以直接在请求参数中放入Principal来接收当前登录用户信息,需要注意的是,即使参数是Principal,真正的实例依然是Authentication的实例。
用过Spring MVC的读者都知道,Controller中方法的参数都是当前请求HttpServletRequest 带来的。毫无疑问,前面的Authentication和Principal参数也都是HttpServletRequest带来的, 那么这些数据到底是何时放入HttpServletRequest的呢?又是以何种形式存在的呢?接下来我 们一起分析一下,
在Servlet规范中,最早有三个和安全管理相关的方法:
public String getRemoteUser();
public boolean isUserlnRole(String role);
public java.security.Principal getUserPrincipal();
- getRemoteUser方法用来获取登录用户名。
- isUserlnRole方法用来判断当前登录用户是否具备某一个指定的角色。
- getUserPrincipal方法用来获取当前认证主体。
从Servlet 3.0开始,在这三个方法的基础之上,又增加了三个和安全管理相关的方法:
public boolean authenticate(HttpServletRespouse response)
throws lOException, ServletException;
public void login(String username, String password) throws ServletException;
public void logout() throws ServletException
- authenticate方法可以判断当前请求是否认证成功。
- login方法可以执行登录操作。
- logout方法可以执行注销操作。
不过HttpServletRequest只是一个接口,这些安全认证相关的方法,在不同环境下会有不同的实现。
如果是一个普通的Web项目 ,不使用任何框架,HttpServletRequest的默认实现类是Tomcat 中的RequestFacade,从这个类的名字上就可以看出来,这是一个使用了 Facade模式(外观模式)的类,真正提供底层服务的是Tomcat中的Request对象,只不过这个Request对象在实现 Servlet规范的同时,还定义了很多Tomcat内部的方法,为了避免开发者直接调用到这些内部方法,这里使用了外观模式。
在Tomcat的Request类中,对上面这些方法都做了实现,基本上都是基于Tomcat提供的 Realm来实现的,这种认证方式非常冷门,项目中很少使用,因此这里不做过多介绍,感兴趣 的读者可以查看 https://github.com/lenve/javaboy-code-samples 仓库中的 basiclogin 案例来了解 其用法。
如果使用了 Spring Security框架,那么我们在Controller参数中拿到的HttpServletRequest 实例将是 Servlet3SecurityContextHolderAwareRequestWrapper,很明显,这是被 Spring Security 封装过的请求,
我们来看一下 Servlet3SecurityContextHolderAwareRequestWrapper 的继承关系,如图 2-21 所示。

图 2-21
HttpServletRequestWrapper 就不用过多介绍了 , SecurityContextHolderAwareRequestWrapper类主要实现了 Servlet 3.0之前和安全管理相关的三个方法,也就是getRemoteUser()、isUserlnRole(String)以及getUserPrincipal,Servlet 3.0中新增的三个安全管理相关的方法, 则在Servlet3SecurityContextHolderAwareRequestWrapper类中实现心获取用户登录信息主要和前面三个方法有关,因此这里我们主要来看一下SecurityContextHolderAwareRequestWrapper 类中相关方法的实现。
public class SecurityContextHolderAwareRequestWrapper extends HttpServletRequestWrapper {
	private final AuthenticationTrustResolver trustResolver;
	private final String rolePrefix;
	public SecurityContextHolderAwareRequestWrapper(HttpServletRequest request,
			String rolePrefix) {
		this(request, new AuthenticationTrustResolverImpl(), rolePrefix);
	}
	public SecurityContextHolderAwareRequestWrapper(HttpServletRequest request,
			AuthenticationTrustResolver trustResolver, String rolePrefix) {
		super(request);
		Assert.notNull(trustResolver, "trustResolver cannot be null");
		this.rolePrefix = rolePrefix;
		this.trustResolver = trustResolver;
	}
	private Authentication getAuthentication() {
		Authentication auth = SecurityContextHolder.getContext().getAuthentication();
		if (!trustResolver.isAnonymous(auth)) {
			return auth;
		}
		return null;
	}
	@Override
	public String getRemoteUser() {
		Authentication auth = getAuthentication();
		if ((auth == null) || (auth.getPrincipal() == null)) {
			return null;
		}
		if (auth.getPrincipal() instanceof UserDetails) {
			return ((UserDetails) auth.getPrincipal()).getUsername();
		}
		return auth.getPrincipal().toString();
	}
	@Override
	public Principal getUserPrincipal() {
		Authentication auth = getAuthentication();
		if ((auth == null) || (auth.getPrincipal() == null)) {
			return null;
		}
		return auth;
	}
	private boolean isGranted(String role) {
		Authentication auth = getAuthentication();
		if (rolePrefix != null && role != null && !role.startsWith(rolePrefix)) {
			role = rolePrefix + role;
		}
		if ((auth == null) || (auth.getPrincipal() == null)) {
			return false;
		}
		Collection<? extends GrantedAuthority> authorities = auth.getAuthorities();
		if (authorities == null) {
			return false;
		}
		for (GrantedAuthority grantedAuthority : authorities) {
			if (role.equals(grantedAuthority.getAuthority())) {
				return true;
			}
		}
		return false;
	}
	@Override
	public boolean isUserInRole(String role) {
		return isGranted(role);
	}
	@Override
	public String toString() {
		return "SecurityContextHolderAwareRequestWrapper[ " + getRequest() + "]";
	}
}
SecurityContextHolderAwareRequestWrapper 类其实非常好理解:
- getAuthentication:该方法用来获取当前登录对象Authentication,获取方式就是我们前面所讲的从SecurityContextHolder中获取。如果不是匿名对象就返回,否则就返回null。
- getRemoteUser:该方法返回了当前登录用户的用户名,如果Authentication对象中存储的Principal是当前登录用户对象,则返回用户名;如果Authentication对象中存储的 Principal是当前登录用户名(字符串),则直接返回即可。
- getUserPrincipaL该方法返回当前登录用户对象,其实就是Authentication的实例。
- isGranted:该方法是一个私有方法,作用是判断当前登录用户是否具备某一个指定的角色。判断逻辑也很简单,先对传入进来的角色进行预处理,有的情况下可能需要添加ROLE_前缀,角色前缀的问题在后面的章节中会做详细介绍,这里先不做过多的展开。 然后调用Authentication#getAuthorities方法,获取当前登录用户所具备的所有角色,最后再和 传入进来的参数进行比较,
- isUserlnRole:该方法调用isGranted方法,进而实现判断当前用户是否具备某一个 指定角色的功能。
看到这里,相信你己经明白了,在使用了 Spring Security之后,我们通过 HttpServletRequest就可以获取到很多当前登录用户信息了,代码如下:
@RequestMapping("/info")
public void info(HttpServletRequest req){
    String remoteUser = req.getRemoteUser();
    Authentication auth = (Authentication) req.getUserPrincipal();
    boolean admin = req.isUserInRole("admin");
    System.out.println("remoteUser = "+remoteUser);
    System.out.println("auth.getName() = "+auth.getName());
    System.out.println("admin = " +admin);
}
执行该方法,打印结果如下:

前面我们直接将Authentication或者Principal写到Controller参数中,实际上就是Spring MVC 框架从 Seivlet3SecurityContextHolderAwareRequestWrapper 中提取的用户信息。
那么Spring Security是如何将默认的请求对象转化为Servlet3SecurityContextHolderAwareRequestwrapper的呢?这就涉及Spring Security过滤器链中另外一个重要的过滤器———————————————SecurityContextHolderAwareRequestFilter。
前面我们提到 Spring Security 过滤器中,有一个 SecurityContextHolderAwareRequestFilter 过滤器,该过滤器的主要作用就是对HttpServletRequest请求进行再包装,重写 HttpServletRequest中和安全管理相关的方法心HttpSeivletRequest在整个请求过程中会被包装 多次,每一次的包装都会给它增添新的功能,例如在经过SecurityContextPersistenceFilter请求 时就会对它进行包装。
我们来看一下 SecurityContextHolderAwareRequestFilter 过滤器的源码(部分):
查看代码
 public class SecurityContextHolderAwareRequestFilter extends GenericFilterBean {
	private String rolePrefix = "ROLE_";
	private HttpServletRequestFactory requestFactory;
	private AuthenticationEntryPoint authenticationEntryPoint;
	private AuthenticationManager authenticationManager;
	private List<LogoutHandler> logoutHandlers;
	private AuthenticationTrustResolver trustResolver = new AuthenticationTrustResolverImpl();
	public void setRolePrefix(String rolePrefix) {
		Assert.notNull(rolePrefix, "Role prefix must not be null");
		this.rolePrefix = rolePrefix;
		updateFactory();
	}
	public void setAuthenticationEntryPoint(
			AuthenticationEntryPoint authenticationEntryPoint) {
		this.authenticationEntryPoint = authenticationEntryPoint;
	}
	public void setAuthenticationManager(AuthenticationManager authenticationManager) {
		this.authenticationManager = authenticationManager;
	}
	public void setLogoutHandlers(List<LogoutHandler> logoutHandlers) {
		this.logoutHandlers = logoutHandlers;
	}
	public void doFilter(ServletRequest req, ServletResponse res, FilterChain chain)
			throws IOException, ServletException {
		chain.doFilter(this.requestFactory.create((HttpServletRequest) req,
				(HttpServletResponse) res), res);
	}
	@Override
	public void afterPropertiesSet() throws ServletException {
		super.afterPropertiesSet();
		updateFactory();
	}
	private void updateFactory() {
		String rolePrefix = this.rolePrefix;
		this.requestFactory = isServlet3() ? createServlet3Factory(rolePrefix)
				: new HttpServlet25RequestFactory(this.trustResolver, rolePrefix);
	}
	public void setTrustResolver(AuthenticationTrustResolver trustResolver) {
		Assert.notNull(trustResolver, "trustResolver cannot be null");
		this.trustResolver = trustResolver;
		updateFactory();
	}
	private HttpServletRequestFactory createServlet3Factory(String rolePrefix) {
		HttpServlet3RequestFactory factory = new HttpServlet3RequestFactory(rolePrefix);
		factory.setTrustResolver(this.trustResolver);
		factory.setAuthenticationEntryPoint(this.authenticationEntryPoint);
		factory.setAuthenticationManager(this.authenticationManager);
		factory.setLogoutHandlers(this.logoutHandlers);
		return factory;
	}
	private boolean isServlet3() {
		return ClassUtils.hasMethod(ServletRequest.class, "startAsync");
	}
}
从这段源码中可以看到,在 SecurityCoutextHolderAwareRequestFilter#doFilter 方法中,会 调用 requestFactory.create 方法对请求重新进行包装,requestFactory 就是 HttpServletRequestFactoiry 类的实例,它的 create 方法里边就直接创建 了一个 Servlet3SecurityContextHolderAwareRequestwrapper 实例。
对请求的HttpServletRequest包装之后,接下来在过滤器链中传递的HttpServletRequest对 象,它的 getRemoteUser()、isUserlnRole(String)以及 getUserPrincipal()方法就可以直接使用 了,
HttpServletRequest 中 getUserPrincipal()方法有了返回值之后,最终在 Spring MVC 的 ServletRequestMethodArgumentResolvei#resolveArgument(Class<?>, HttpServletRequest)方法中进行默认参数解析,自动解析出Principal对象,开发者在Controller中既可以通过Principal 来接收参数,也可以通过Authentication对象来接收。
经过前面的介绍,相信对于Spring Security中两种获取登录用户信息的方式,以及这两种获取方式的原理,都有一定的了解了,